
Builders' Forum |
|
| ↓ Scroll to Last Comment ↓ | Forum Guidelines | Builders' Forum | |
Is anyone currently documenting their CLC Peapod build?
45 replies:
RE: CLC Peapod build
Not yet. We've been talking photos and time lapse but haven't made things public. Anything you'd like to see?
RE: CLC Peapod build
Here's some. I'll add to it when I get back to it https://photos.app.goo.gl/wwVQ8EHWdKLHh9EZ6 Hope the link works!

RE: CLC Peapod build
I've got a camera on a tripod in my shop and I'm taking photos along the way. No video yet. Keeping a journal too.
I'd like to communicate with other Peapod builders!
[email protected] 919-696-3651.Raleigh, NC
RE: CLC Peapod build
Does anyone have the approximate dimensions of the visible part of the centerboard trunk above the floorboards and of the wear board on the top strake? I have a kit ordered but it's going to be 2 months and I want to have some art work ready to go for those areas when the kit arrives.
RE: CLC Peapod build
I have been posting about my UK Peapod build on Facebook. It's more of a personal diary for the amusement of friends at the sailing club than technical build record. But if you are interested search out the Bad Taid Eto page (btw the name is Welsh)
RE: CLC Peapod build
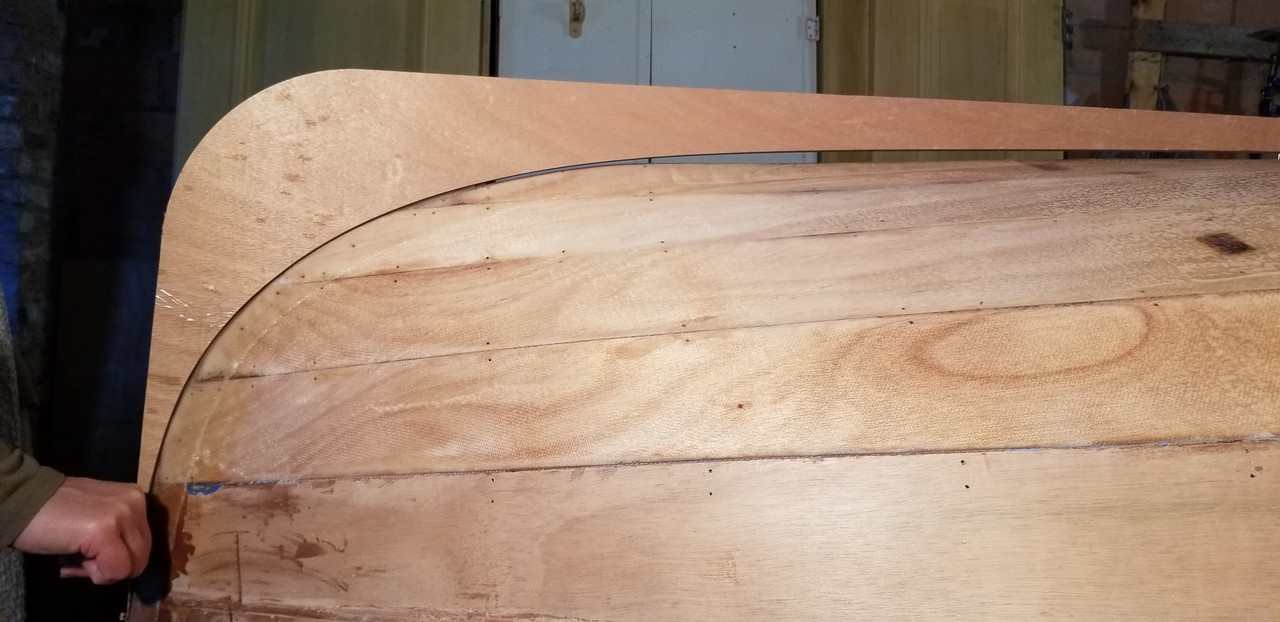
I am about to install the skeg but find that there is huge long gap between the bottom of the hull and the long part of the piece. The gap is 1/2" at its widest. Has anyone encountered this? Any ideas on how to deal with it?
Thank you.
RE: CLC Peapod build
Jose, The manual mentions removing quite a bit of material from the stern ( and the bow). Take a look at what is preventing the skeg from sitting flush. Suggestion: Move the skeg aft until it is flush with the bottom and not touching the stern. Then move it forward until it just touches the stern. That may give you an idea what and where the material needs to be removed from the stern. sneak up on it an sand small areas...you cant put the wood back! Dean
RE: CLC Peapod build
Dean, thank you for your suggestion. I don't know how I could possibly remove materail from the stern now that the hull has been fiberglass and has two coats of epoxy on it, without this becoming a major project. The manual does say to remove material before fiberglassing, the skeg-fitting being much later in the process.
Here are some photos:
https://postimg.cc/gallery/4cxvt3y
I can' tell if shaping the skeg itself will help.
Have you reached this part in your build?
RE: CLC Peapod build
Never underestimate the ability of the wood flour goo to hold things together. It's holding on the transome of my Peeler and try as I might the 15hp outboard is still there.
That gap looks doable. Sculpt the goo carefully and any clean up can be made easier with a heat gun.
RE: CLC Peapod build
Does the manual call for attaching it with screws that you run from inside the hull up into the skeg? If you do it right, the screws should pull out most (or all) of that gap. Judicious use of wood putty filler will mak it all watertight and conceal the small remaining gap.
RE: CLC Peapod build
I thought filling in with wood flour putty could be an answer. Glad to have confirmation. As for the screws, yes they could pull it close to the hull, but would probably make it bend (or break). In any event, thank you very much for your advice, very much appreciated.
RE: CLC Peapod build
Hi Jose. I have not got to this bit of my Peapod build yet. However the manual does say to trim the skeg so that it fits snugly against the hull. Your gap is bigger than I would have expected from the manual but I would try triming a bit off of the inside of the curve of the skeg to close that gap a bit before pulling it up closer with screws or relying on epoxy to fill the gap. Paul
RE: CLC Peapod build
Jose, I haven't reached that point but I just held the skeg up to the boat from below and I have the same condition in the same spot. It was all I could do to pull the stern together and I now see the dip that developed the gap just like yours. I don't recall this problem on the prototype at WB as shown on P.152 (that's me with my arms crossed) I agree with the previous posts. At this point take some off the skeg and fill with peanut butter. Gentle later when you install the screws and pull the skeg to the boat. I'd like to hear from CLC on this. As I mentioned it was all I could do to pull the stern together...the last thing I was looking at was to ensure the skeg fit. Dean
RE: CLC Peapod build
It's good to know I am not the only one that had a hard time finishing the stern. It took quite a few extra holes with copper wire and then quite a bit of filling and sanding. Like you, I though it all looked pretty good in the end until I dry fitted the skeg and notice the dip and gap. Thank you for the suggestions. I am putting this off for a while as in fact I have not yet reached this part in process. I just decided to do a dry fit of the skeg after fiberglassing the bottom and before flipping the hull, and was surprised by the gap.
Jose
RE: CLC Peapod build
I'm still not ready to flip the boat. When I do I plan to fit the skeg as well as possible before fiberglass. I realize now not much of the stern can be removed so the skeg will need shaping. That, and good ole peanut butter as previously mentioned to fill the gap.
Keep us posted and I'll report back too.
Dean
RE: CLC Peapod build
I plan to register my Peapod here in NC. I don't have to as less than 14' does not require it. However I will. So, has anyone thought about how to afix the HIN to the stern in a proper way that looks good ? Outboard starboard stern here in NC but your state may specifiy different...
Dean
RE: CLC Peapod build
Dean and Jose
Thank you for the heads up about your experience of the keel rocker not matching the curve on the skeg.
I have now got planks one to five and the ribs stitched together and on the whole it is looking good. However I have noticed that the keel looks like it may be developing a slight reverse curve (or possibly just a flat section) about 12-18" aft of rib 5 just like the shape in Jose's photo. With your experience I will be carefull to watch the shape here when I tighten up the stitches after attaching planks 6 and 7. I plan to check the hull shape against skeg, centreboard case etc. before fixing everything in place with epoxy.
Paul
RE: CLC Peapod build
Paul, you may be able to shave/sand off enough of panels 1 and 2 to reduce the curve. However I am not sure if that curve is supposed to be there or not.
RE: CLC Peapod build
Update on the skeg fit: Yesterday I flipped the boat and could better see the 1/2" gap. After cleaning up the stern curvature I set the skeg on the boat to identify where to remove material. I moved the aft part of skeg slightly off the CL until it fit flush forward and marked the area to be removed. First thought was use the bandsaw. Too much commitment!
Break out the rasp...
After may trial fits it sits nicely. Interesting note 1/4" removed from the inboard side of the skeg drops the skeg about 1/2" onto the boat.
Cheers
Dean
RE: CLC Peapod build
Thank you for the update Dean. So all the material you removed was from the skeg itself?
RE: CLC Peapod build
Jose,
Yes. Save for the little bit to shape the stern. Time to prep the bottom now.
Dean
RE: CLC Peapod build
Jose,
Yes. Save for the little bit to shape the stern. Time to prep the bottom now.
Dean
RE: CLC Peapod build
Still a fair way behind you but over Christmas/New Year I think I managed to finish the stitching. Seems like I had a similar experience to Dean, it was hard work getting the stern just so. Bevelling the edges of the planks along the centreline join made a big difference. Even so it took two attempts to close the gaps where the notches are cut at the end of planks 4 to 7 - I am on pause while I consider whether a gap less than the thickness of a matchstick is too big to 'hide' with filler or whether I need to backtrack a bit and try again to get a light-tight join possibly shaving a bit off of the upper edge of the planks where they fit into the rabbet.
I took the opportunity to test fit the skeg. I have got a bit of a dip in the same place as Dean and Jose but it is much less than it was before I bevelled the planks along the centreline. Thanks to your heads up about the potential problem I will use the skeg as a template when I get to the stage of the build where the stem and stern get shaped (after glassing the interior and before glassing the exterior).
On the bright side it is now looking like a proper boat😀
Paul
RE: CLC Peapod build
Paul,
On the stern joint gaps: I asked CLC about this and they said up to 1/8" no problem. I used that as a guidline and coverred with woodlfoured mix. That took care of it.
RE: CLC Peapod build
Thanks Jose
That's good to know and is consistent with the advice I have had from the UK supplier. Gaps of that sort of size would not compromise strength - but would be cosmetic if one were going to varnish the outside. They suggested big clamps (or planks top and bottom and a Spanish windlass arrangement) would squeeze the planks together that last few millimeters. But I am going to stick where I am - fill gaps with filler and cover with paint later.
RE: CLC Peapod build
I was inspired by the dyed floorboards and seats in the manual. There's alot of bright wood on this boat and I'd like to see some contrast. Also the centerboard trunk is so incredibly light I suspect it is not okoume and it needs some help.
I picked up a pint of General Finishes water based dye stain and did some 1,2,3..4 coat tests on a scrap piece of okoume. I like it and it was easy to work with.
Plan is floorboard, seats and centerboard trunk get color. Hull is a whole nother topic...
Thoughts? Who's adding color?
Dean
RE: CLC Peapod build
Dean,
Color:
I have just finished staining the floorboards with medium mahogany from mohawk and plan to do the same with the seats. It is rather dark but I think it will give a good contrast with a white hull exterior. I am happy with that but this is all about personal preferences of course. The centerboard trunk looks good with several coats of epoxy and not stain. I plan to varnish it and so far it matches the oukume interrior.
RE: CLC Peapod build
Further to Dean and Jose's posts above re the gap between skeg and stern.
I have just taken all the stiches out so can properly offer up the skeg for a test fit and lo and behold I had pretty much the same gap.
Talking to the UK supplier and a friend who is also building a peapod I am fairly certain that the answer is (or would have been) to cut a bevel along the last 12-18 inches of planks 1 where they join to form the centreline. It's not mentioned in the build manual but it would be consistent with the guidance in the Gougeon Brothers' book on boat building.
It would help the planks sit nicely against each other rather than slipping over each other and I think it would stop the last few inches of the keel join 'bulging' out (there is a similar bulge/dip at the bow). It is well too late for me to do anything about it now so like the others I will be triming the skeg to fit and also using the skeg as a template when I came to shape the stern..

RE: CLC Peapod build
The boat is upside down and I'm ready to glass the bottom. Does the 3" strip go all the way to the tip of the bow and stern or does it stop at the 4/5 strake like the cloth?
Dean
RE: CLC Peapod build
I called CLC this morning. I'm told the 3" goes all the way to the tip of the bow and stern. So...there you go. Warmer weather here in NC today. Epoxy time.
Cheers
Dean
RE: CLC Peapod build
I had the same negative rocker in bow and stern. A couple of applications of microballoons got her fair.
Bert
RE: CLC Peapod build
Thanks Bret,
Well there we have another one.
I'd like John Harris to take a look at this problem. I'm seeing creative ways to deal with the gap but I believe this is a design flaw or maybe the limit of design for a stitch and glue boat today. Clearly the stern is a bunch of complex curves all stuffed into a small area. I'm no boat designer but it seems like there is too much or too little material.
Regards all
Dean
RE: CLC Peapod build
Here's an alternate method to fill the Lap joints:
The manual calls for peanut butter blend and wipe the joint as if it were a fillet. I mixed the epoxy and left it soupy, more like jam. Fill the joint carefully and let gravity work for you since the boat is upside down now. it made a nice puddle in the joint and no wiping. It does require a steady hand. Also, cut the bag corner smaller to better control the delivery. Worked for me!
Cheers
Dean
RE: CLC Peapod build
Did anyone else find the Mizzen mast step to be completely in the way of placing the middle skeg screw? Seems like an oversight in the plan: 12" aft of the 5th rib puts the screw location right inthe rear of the mast step, in a quite inaccessible spot!
P
RE: CLC Peapod build
Pippy,
Yes! While the boat was upside down I measured and drilled a pilot hole for the skeg from the bottom. Only to find out it was directly under the limber hole. Filled it with epoxy and moved the hole forward. Fun!
Dean
RE: CLC Peapod build
I do not have this kit but have some thoughts concerning the hollow under the skeg.
Would putting spacers between the bottom planks at the location of the skeg gap fill it out at all? You could use stirring sticks, ply scraps or whatever to create a gap between the planks Start small, tighten the wires and see if you can remove some of the gap under the skeg. Any reduction would help. Don't create a hump or ripple that would be worse. Flowing lines are more important than precise measurements.
If it somehow does actually help a filler piece similiar in shape to a stretched double circular arc could be inserted between the planks. https://www.researchgate.net/figure/Double-Circular-Arc-Airfoil_fig1_281627413
The bevel that some have found helpful could be used in conjunction to reduce the defect.
Just a thought.


RE: CLC Peapod build
» Submitted by RoamingGnome - Mon, 9/21/20 » 2:18 PM
Yep! In a bit of a holding pattern since I'm a teacher and this year's "back to school" had been INSANE. I'm up to (and part way through) interior glassing.