
Builders' Forum |
|
| ↓ Scroll to Last Comment ↓ | Forum Guidelines | Builders' Forum | |
I've put my passagemaker in the water two times, and I've gotten a little water leaking in. No more than a pint after one hour on the lake. While I can just use the sponge when out on the water, I'd really like to find where the water comes in and patch any holes.
suggestions on find and repairing?
14 replies:
RE: Finding small leaks
If you're using a compressor make sure it's an oil-less one, like for airbrushing. Epoxy won't stick to oiled wood.
Laszlo
RE: Finding small leaks
Thanks Laslo. I think I found the leaks. It's right at the edge of fiberglass sheeting around the jigsaw joint. I can't see any light coming through, but can see water as it seeps in. I might also be seeing some discoloration of wood underneath.
I still have to borrow the air compressor from my son and do what you suggest to find the source
my question is how to fix it. Can I put thickened epoxy over the paint on the outside of hull? Can I sand off varnish and then do an epoxy patch?
the leak is really small maybe 2 cups of water after 1 hour of rowing. but I don't want to make it worse.
RE: Finding small leaks
Another question-- the tiller seems too long when I try to sail while sitting on floor. Should I just shorten it or cut and add a hinge to let it fold up on itself.
RE: Finding small leaks
When you find the leak, post a picture. There's not much point in discussing what to do until then because there's so many ways to fix S&G leaks depending on what's causing them. BTW, 2 cups an hour for a stitch and glue boat is a gusher and needs to be fixed ASAP.
Laszlo
I found the leak
I found the source of the leak - near jigsaw joint. You are right - it's a sizeable hole.
I'm having trouble uploading photos. I know there are directions somewhere... I've cleaned and enlarge the hole on the bottom --- do I fill it with thickened epoxy, and repaint?
RE: Finding small leaks
How to Post Photos on the CLC Forum
First, make sure that the crack completely dries. You don't want water stuck under the patch.
Second, remove any paint, varnish, etc. for a couple of inches on each side of the leak. You're looking for clean dry epoxy or wood.
Third, fill the gap. In the past I've used packing tape to seal one side of the crack, then poured in unthickened epoxy. If the crack is wider then I use thickened epoxy. The packing tape may still be a good idea to stop drips and leaks.
Finally, once it's completely cured, sand it smooth and paint it.
If you want to really do a good job, you can put a glass patch on each side of the crack, then fill the weave and feather the patch before painting.
Laszlo
RE: Finding small leaks
I have a boat in the shop for a month. It has been drying at the hatch leaks. It has taken that month of airconditioning to move the moisture from 19% to 9%. Dry enough now but it was slow. I had to add heat and air flow to speed up some areas.
RE: Finding small leaks
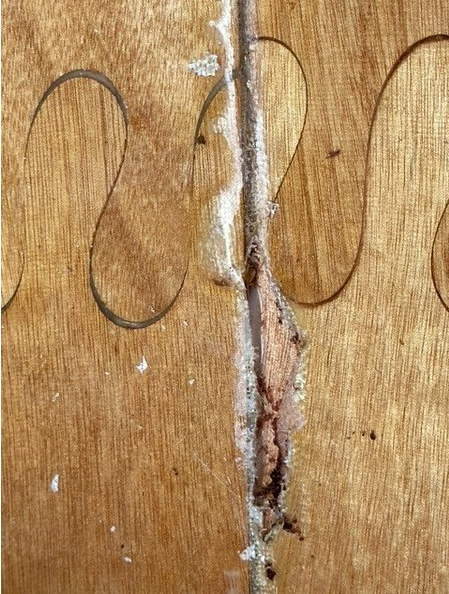
Thanks for the advice. I think there are two photos at the URL below. hope it works.
I've sanded and epoxied the llittle gap on the inside and opened up the whole in hull -- will fill it with thickened epoxy and then repaint / varnish.
A friend who has made a couple of CLC boats gave me this tube of 3M glazing putty -- can I use this instead?
https://peterbrown.smugmug.com/PJB-hole-in-boat/n-hL3BpN
RE: Finding small leaks
Thanks for the pictures...it makes it clear now.
i would take the approach recommended above,
- arrange the piece so you can put packing tape on the back side of the repair and gravity will pull the expoxy into the crack from the other side.
- drip unthickened epoxy into the crack gap to completely fill all voids (you could put a small amount of wood flour in the expoxy for color but you want it fluid and able to get into the the voids)
- sand the area around the repair and lay a new piece of fibreglass in after you are sure you have filled the void with epoxy.
you can potentially combine steps 2 and 3 but you want to ensure you don't put glass over a void/bubble.
after you have repaired the interior, i would then sand the paint on the outside and re-epoxy the wood and then paint over it again just to ensure all exposed wood is now fully coated with epoxy and no voids left.
h
RE: Finding small leaks
Glazing putty is a filler, not a structural adhesive. It's weaker than Bondo. Glazing putty is meant to fill surface dings, not join pieces of material. Even if you covered it with glass on both sides it would be a weaker joint than the original design.
Laszlo
RE: Finding small leaks
Thanks. I didn't use the glazing putty. In the inside, I cleaned out the hole and removed varnish. Filled with thickened epoxy anthem revarnished. Gave a new coat of paint on hull. Checked it out again with compressor. We'll see when I put it in the water. I appreciate the help.
RE: Finding small leaks
I had a more basic question. Why was there a break in the fiberglass cloth over a puzzle joint in the first place?
RE: Finding small leaks
On your question about the tiller: I also thought it was long and got in the way. I made a shorter one (don't know the length offhand, but it was a good bit shorter) and I found the steering was really hard. Took it off and went back to the original. I may try making another not quite so short-maybe 6" shorter.


RE: Finding small leaks
» Submitted by Bubblehead - Thu, 8/17/23 » 3:54 PM
With the stitch/glue/wood/fiberglass construction of these boats I would say a leak is a very big deal and really needs to be identified and remedied. A leak might very likely also indicate that you have a place where water is touching bare wood, which over time will be a big problem. It wasn't actually a leak, but I had an unsealed area at the hole for the downhaul line in the rudder blade on my NE Dory. Just didn't do a good enough job with the q-tip and epoxy after drilling that out. Didn't take long to see the wood discoloration in the area. Centerboard trunk would be a likely location for your leak, but there could be many others.
If you're not finding the leak by simply inspecting while the boat is floating, you might try turning her over on sawhorses and getting underneath while the sun is shining brightly. Be advised that if you didn't paint the boat there might be many places you see some light coming thorough perfectly fine/good seams and stitch holes, but you might also find the leak.
If you have an air compressor, you can put a nozzle on the air hose and have a partner "blast" air at the boat from 6-12 inches away, while you are on the other side of the area being blasted, with a Kleenex or similar thing in hand near the area being tested, or fingers or cheek near the area, or wipe area with a soapy solution and look for bubbles. Having the compressor motor off while blasting might possibly help ID any leaks by ear. Then turn it back on to periodically refill the tank.
You can do the same as the air blast test with a garden hose-doing a water blast test.
and just FYI: An air blast test is an "official" QA test used when assembling/re-assembling certain fittings on submarines, like compressed rubber plugs that seal thru-hull penetrations for cables and the like. Of course they get re-inspected during actual test dives, too, before the work is signed off as fully complete.