
Builders' Forum |
|
| ↓ Scroll to Last Comment ↓ | Forum Guidelines | Builders' Forum | |
Fitting the seats in the Peeler
My 11 yr old son and I are building the Peeler and really enjoying it. We're somewhat stuck though as we can't seem to ge the seats to fit in. I contnue to sand down the outer sides which seems to be what it needs. Before I took this too far (took off too much) I wanted to see if there was some trick to it or soemthing I was missing.
Thanks,
Jack
12 replies:
RE: Fitting the seats in the Peeler
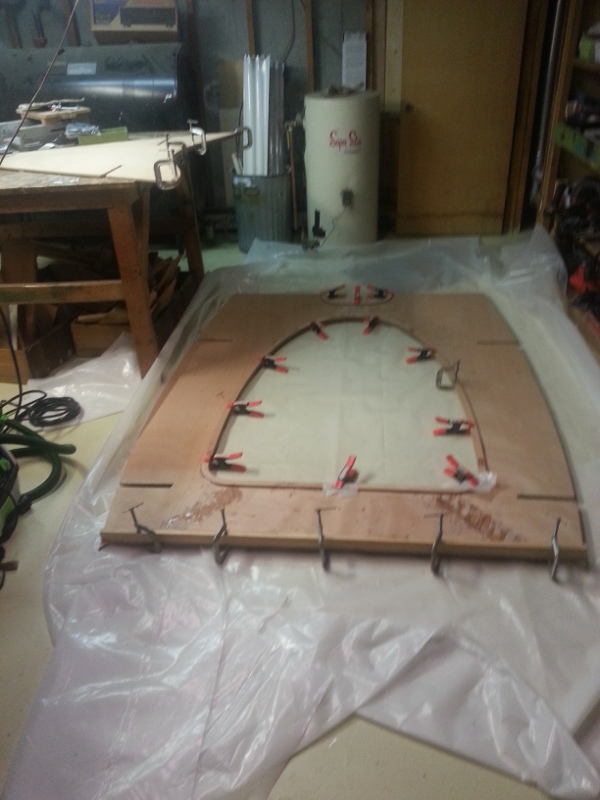
I am just about ready to flip my Peeler. The only fitting that I have had to do to date was the seats - both fore and aft. I probably removed 1/4 from each side in the back a little less in the front. I was able to scribe the back seat halves before they were glued together - it would be much harder had I glued the assembly first. The notches in the seats should touch the risers on the bulkheads. The fore seat was just eyeballed. I tried a plane, Shinto rasp and surform before settling on a belt sander. All in all it was pretty easy if a little nerve racking. The joints are covered with fillets and tape.
RE: Fitting the seats in the Peeler
The easiest way to know where you need to remove material is to place the seats in their respective positions (unassembled in the rear). You can then scribe the edges with a compass and then remove material along the edges to the line that you have scribed. Don't make your scribe line so far inboard that you are removing more than about a quarter of an inch at a time. I found that a sharp low angle block plane worked best for material removal. Also bear in mind that the sides join the sides at an angle, so that you must remove the material at approximately the same angle. Also put the center thwart in and monitor the overlap of the puzzle piece joints where it joins the side pieces and also the joint at the stern. In the beginning they will overlap and not fit together. As you get closer, through trimming, they will get closer to fitting until you have removed enough from the sides, then they will fit together easily. I found that the fillets and the bulkheads interfered the most with the final fitting of the seats. This required lengthening the slots in the seats and rounding the corners to accomodate the fillets.
Remember that you can use very large radius fillets at all the joints where the seats meet the sides because of the large (well over 90 degrees) joint. This will hide any irregularities in the seat to side joint.
This was a fairly time consuming stage for me, but be patient and you will achieve a nice fit.
Jack
RE: Fitting the seats in the Peeler
Thanks Dick, Jeff and Jack, that's helpful. Dick, these are the cockpit (aft) seats. Thanks too for the reminder about taking off the edges at an angle. I've been using the rasp and getting good results, just need to take more off to have the starboard side lay flat and allow the puzzle joints to fit.
We'll move through it slowly and I'm sure it'll come together nicely. Appreciate it guys.
RE: Fitting the seats in the Peeler
This is a fussy bit in the build. I used the same technique of scribing and shaving until the puzzle joints matched up. I also had to lengthened the slots for the bulkheads. One point I'd add is to alternate the sides so the seat assembly is centered.
Enjoy your build and send pictures.
RE: Fitting the seats in the Peeler
Thanks for your feedback all. I did take my rasp to the sides and got more aggressive and was able to fit the aft puzzle joints and sides well. It all fits well except when I fit the forward puzzle joints on the seat (in front of the console). In tne forward seat when one side of the puzzle joint goes together the other he other puzzle joint- the last part to go in to make it all fit- isn't close to fitting - it overlaps by maybe 2 inches. Any more sanding/rasping and there'd be too much gap(s) in the back.
Has anyone dealt with this before? I tried to upload a picture but can't seem to.
Thanks, Jack
RE: Fitting the seats in the Peeler
I had the same situation with my aft seat at the front puzzle joint. Install the seat and tap around the edges with your fingers. If the seat vibrates (up and down) then it is loose enough in that area. The seat should be binding where it is too tight and needs to be relieved even more. I found that the fillets and the slots were the last places that were too tight. You will need to remove more material at the front. Re-scribe again about 1/16th of an inch where the seat is binding, alternating sides, then remove material in that area, making sure that you are angled in at the underside of the seat to follow the angle of the side.. Stay away from the aft section where it is fitting OK. It may seem that the overlap of the puzzle joints is large but a small amount of material removal along the edge where it is binding will make a difference. Take it slowly and "it will all work out in the end. If it isn't working out, then it's not the end".
Jack
RE: Fitting the seats in the Peeler
For my Peeler build, the puzzle joints were the primary fitting issue. So we completely assembled and glassed the cockpit seats on a flat cellar floor before fitting them to the boat. Jist one fewer thing to line up when installing the seat. I may be a chicken but it worked for us.
It'll all workout in the end.
RE: Fitting the seats in the Peeler
I remember that was one of the trickiest parts of the build. I didn't glass my seats but I dry fitted the puzzle joints and had a helper lift the entire unit into place to scribe marks on the sides to shape them. We did this process many times until the whole unit would drop in nice and flat on the bulkheads and tank sides. If you are worried about damaging the puzzles you can use two small boards and spring clamp them over and under the joints until they are resting in the boat. Then remove the clamps to fit. I remember taking a little off each side like 20 times before we got the whole thing to drop in flat. After they fit nice we glued up the joints. I set the entire unit on four horses and air clamped the joints using two stiff boards with plastic wrap for each joint and using different size clamps to squeeze the boards together and mate the joints. Came out pretty perfect. Or you can use the weighting method if you have a solid build table or really flat floor. If you have shaved off too much material anywhere dont worry, the fillits will cover the errors. You will want to shape in some scrap wood to wedge in the gaps so your fillit material doesn't "drain" out or sag into the tanks. It takes time. I'm still not done with my boat. 27 months now! lol! one more coat of varnish!
RE: Fitting the seats in the Peeler
SurferBill is right. With these building methods, you can fix almost anything.
RE: Fitting the seats in the Peeler
Thank you guys, very helpful. Pictures are nice too. I'm going to work and will report back!


RE: Fitting the seats in the Peeler
» Submitted by Dick Dowdell - Mon, 3/30/15 » 6:46 PM
Your best guide is the Peeler Skiff Manual. CLC did a great job with it. I bought an extra copy just so there was a copy in the workshop (12 miles from my home) and one I could read at night to prepare for the next day. I always learned more every time I read it.
You didn't specify which (forward or cockpit) seats were a problem or where they were binding. We could probably be of more help with that information. There are many reasons that the parts need to be adjusted, not the least of which is the fact that they're wood. Even if cut perfectly, wood (even plywood) does swell and shrink with their moisture content (I can remember a fair amount of filing required to fit the puzzle joints on my Peeler) and every sheet of plywood bends slightly differently.
The plywood, glass, and epoxy construction techniques allow one to fix almost any mistake, so don't worry too much. Just take things slowly and take off only a little material at a time. Then try the fit again. A rasp worked well for me. In boatbuilding, patience is a virtue.