
Builders' Forum |
|
| ↓ Scroll to Last Comment ↓ | Forum Guidelines | Builders' Forum | |
Stitching Bottom & Side Hull Panels For Chesapeake17LT
Greetings All. I am a 1st-time/novice builder & am working on a Chesapeake17LT kit. I have to admit, after watching the video & reading the manual a few times, I was a bit cocky and thought this would be no problem, but epoxying the hull panel puzzle joints was humbling & made me immediatley gun shy! (I'll spare you photos of that mess...did manage to clean it up a little better post-sanding.) After a period of mourning (ha!), I pressed on. I'm now at the point of stitching the bottom panels onto the side panels for the hull. I'm currently in a PAUSE state.
I made sure I had an aligned bow, and began to slowly stitch down the boat. 1/4 of the way down, I looked back at the bow and saw that the Bottom Panels were sticking out about 1/16 - 1/8" (the video shows this happen & mention it could be sanded smooth later). I thought since I was only a 1/4 down the boat, I would make adjustments to realign the bottom to side panels & I did (realigned bow) and then continued on.
BUT...Here's My Problem
As I was walking around the boat to do 5-stitches on the other side, the stern caught my attention. Back here the stern "tip" of the bottom panels is sticking out on the order of 1/2"! (pic & wider angle pic)
This is where I have paused. I'm wondering what's the best plan forward:
- Continue & remove the excess at stern (via Japanese Saw?)
- Start over & readjust Bottom Panels to balance overhang at bow & stern, and then remove excess material from bow & stern.
- What other option?
Thank you in advance for advice, consoling, etc.
Best,
Corey
11 replies:
RE: Stitching Bottom & Side Hull Panels For Chesapeake17LT
Loose first, then slowly tightening and adjusting is the standard advice.
It's useful to use steel wire for the 4-corners area at the bow & stern, because the copper will break too easily. If you "tack weld", avoid the steelie. If you can't avoid it, use the heat-and-pull method, with a bbq lighter (on the wire...) and pliers. Try not to leave the steel in place- it won't sand (or be planed) like the copper ones that sometimes get left behind.
The CH bottom and side panels aren't the same length- you will need to sand/grind/cut the bow and stern overages to get the final shape. It's not your fault. It's not a big deal either, as having the sander in hand with coarse grit encourages rounding/shaping/contouring to get a more water-friendly and boat-like shape at each end.
I think (and I recall John H writing this at some point) that the spreader stick should be removed as soon as the two bulkheads are put in place. The directions imply it should be kept in place much longer than is useful. It actually makes the bulkheads more difficult to put into their correct locations if it is kept in the boat since it creates a 3rd point along the curve instead of just 2- and it's easy to fixate on the stick as it seems responsible for the boat's beam, one if it's most critical dimensions- but it's just best to let the bulkheads do that, after the stick has been used to get the bottom 4 panels stitched.
Hope that helps- I've really enjoyed mine!
RE: Stitching Bottom & Side Hull Panels For Chesapeake17LT
Make all the stitches "loose" . Then tighten them up in staghes. Making one end tight then moving down the boat will push things were you don't want them to go. Make sure the boat remains aligned. I string up a string line bow to stern and put levels across the "gunwhales".
RE: Stitching Bottom & Side Hull Panels For Chesapeake17LT
Amen! to the string idea. The trick is to give her a little shake from time to time to release any sticking points as you go around and around, tightening things up by degrees.
.....MIchael
RE: Stitching Bottom & Side Hull Panels For Chesapeake17LT
Thank you SO much for all of your advice: nemochad, Gramps, & Grumpy!! Last night I went ahead and loosened up any stitches I made tight.
Then I made the Bow connection flow for the Side/Bottom panels in the front, but I do still see that Stern overhang of about 3/4" - 13/16" even with everything loose (wish overhang was as small as in the video!).
I reckon Round 2 will be next and I'll proceed with loose stitches & give the assembly a shake as I go to release any tension. The Manual does explicitly say to keep the bow aligned, so I'll be sure to monitor it & adjust accordingly while I'm in this loose state.
Grumpy: thanks for note about the string & level via the gunwhales!
nemochad: Thanks for summarizing again and the note about the Spreader Stick. I really do hope to get to a point to enjoy my boat! It is fun and exciting to think about putting her in water!
Anyway, I'm taking all of your advice into consideration, re-reading the manual again, looking at the video, and then will begin Round2! :) THANK YOU!!
RE: Stitching Bottom & Side Hull Panels For Chesapeake17LT
Oh, yes, you're going to need to pretty much wear the manual out. It should be right to hand by the "moaning chair" in your shop so you can sit down comfortably when you get frustrated with something, have a cup of coffee (save the stronger stuff for after the work session), review the manual, and give your brain some time to sort it out.
.....Michael
RE: Stitching Bottom & Side Hull Panels For Chesapeake17LT
Ooo, and even more great and sage advice! (re: coffee!) ;) My manuals are definitely becoming weathered. Ha ha.
Thank you & have a great weekend, eh!!!
RE: Stitching Bottom & Side Hull Panels For Chesapeake17LT
Is this what was happening at the stern corey?
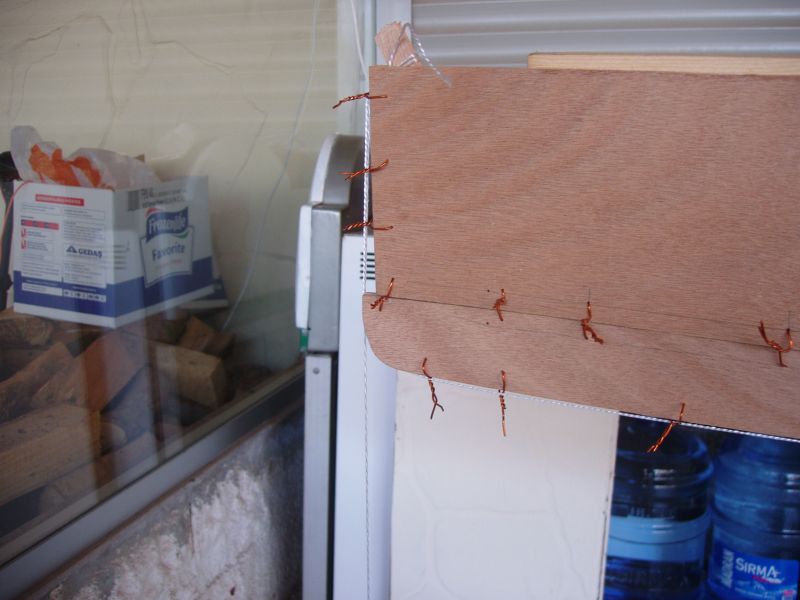
I was a bit concerned so checked all the measurements (building from plans) and it was all good. So I just cut it off. :-)
RE: Stitching Bottom & Side Hull Panels For Chesapeake17LT
���Just thought I would mention that picture above from Rambo and your pictures were occurred on all four Chesapeakes I built. As described, just cut it off in alignment with the stern and you are all good. H
RE: Stitching Bottom & Side Hull Panels For Chesapeake17LT
I've not done a CLC kayak yet, but my Skerry was looking like panels wouldn't land in the right place until I was done with all the ties. It was after each panel was tied to its mate that the curves really lined up and made the whole thing form up. Until those chines are wired up at least loosely, the final path each edge will take isn't quite there. That may take some of the apparent mismatch away, as the 3d path the edges take is created. That said, on the skerry, there is some planing/sanding and filleting to make the final form the stems will take. Not as much as I see in your picture, but some.


RE: Stitching Bottom & Side Hull Panels For Chesapeake17LT
» Submitted by corey_WA - Wed, 5/20/20 » 5:11 PM
Got some advice from CLC. One problem (which I failed to mention) is that in order to keep the bow aligned, my stitches were tight. This could be one of my problems. So I'm going to make sure all my stitches are loose and just stitch the whole bugger. Then is when I'll focus on alignment.