
Builders' Forum |
|
| ↓ Scroll to Last Comment ↓ | Forum Guidelines | Builders' Forum | |
The interior of my Skerry is nearly done! I just have to install the mast partner and step, and then that's it.
I'm looking ahead in the manual, and found this description of shaping the daggerboard:
With a tri-square ... mark a line 1" from the edge of the front and bottom of the blade, and 2-1/2" from the trailing edge. ... Sand two neat wedge-shapes into the leading and trailing edges using the pencil lines as a guide. By hand, convert the even wedge-shapes into a bullet-shape for the nose and a smooth taper for the trailing edge.
I'm not really sure what is being described here. I'm guessing that they are aiming for a tear-drop shape, with the front of the daggerboard resembling a teardrop. More elongated than this picture shows, with the leading edge corresponding to the bottom of the teardrop, and the trailing edge tapered to a point. Is that right?

9 replies:
RE: Shaping the daggerboard
It's a painstaking process, but you'll get it. Just look at an airplane wing, and that's the goal. It doesn't have to be perfect. Mine for the Eastport pram took me a couple hours with 60 grit, then 150, then finished with 220. Used orbital sander.
RE: Shaping the daggerboard
Thank you. I'd appreciate any suggestions on how to achieve this shape. I can see drawing the shape on the bottom edge of the centerboard, but maintaining this shape for the length of the centerboard seems difficult.
RE: Shaping the daggerboard
I made a template of the profile required...
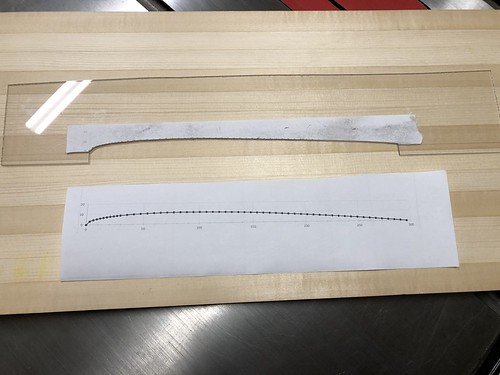
It's really easy to taper the leading edge too much, it want's to be pretty blunt.
Good luck.
RE: Shaping the daggerboard
Silver Salt: Thank you, but being a beginner, I'm not connecting the dots.
How do you ensure that the shape of the template is transferred to the wood accurately?
That Lie-Nielsen thing is a plane of some kind, I'm guessing? How do you keep it moving in a straight line across the length of the wood, and how do you ensure it has the correct angle (matching the template)?
I was thinking that with the interior of my boat done, it was going to be a few short tasks to do the rudder and daggerboard, but what you've done looks like a large project on its own.
RE: Shaping the daggerboard
>>That Lie-Nielsen thing is a plane of some kind, I'm guessing?
Close. It's a spokeshave - a cutting blade in a 2-handed handle. YouTube will show you all the videos you'd ever want to see about how to use one. Most inportant - keep it sharp!
>>How do you keep it moving in a straight line across the length of the wood
The same way you get to Carnegie Hall - practice, practice practice. Seriously though, he pencil lines that Silver Salt drew on the wood show the unshaved wood. The lines disappear when the wood is shaved. So the lines show you if you're dragging the spokeshave in a straight line as well as where the wood has been shaved and where it hasn't. Apply corrections as needed.

>>how do you ensure it has the correct angle (matching the template)?
Placing the template against the wood lets you see how well the curves match. Shave the high spots until there are no gaps.
You can also do all this with a sander and coarse grit paper if a spokeshave is unavailable or out of your comfort zone.
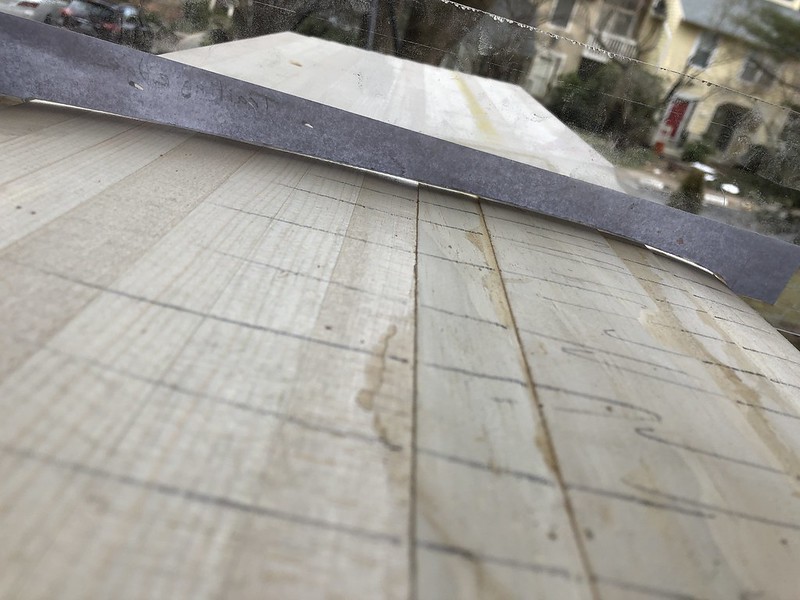
If you are shaping a piece of plywood, the plies act as contour lines which let you track the curve and see where you need to sand/carve more. This is how my schooner rudder looked close to the end of the process.

The countours need to be fair. These are almost there. The worst defect is at the top where I sanded in a curve from the edge to the surface.
The main thing to keep in mind is to go slowly. If you're in a hurry to get it over with, just round the leading edge and taper the trailing edge and leave the middle alone. That will be good enough to get on the water. Later on, when you get tired of the board chattering in the well and the boat being slow in irons, you can alway get out the belt sander and fix it up properly. You'll be pleased at the difference.
Laszlo
RE: Shaping the daggerboard
Thank you, Laszlo. So whatever I do, I need a belt sander, not an orbital sander? I can see how a belt sander makes more sense.
What about a router with a roundover bit for the leading edge?
Also: that schooner rudder seems pointer at the leading edge than I would have guessed, looking at that template that Silver Salt posted. Or am I "reading" the contour lines incorrectly?
RE: Shaping the daggerboard
You can use either orbital or belt. It's a matter of preference, mostly. I used a belt sander for the bulk removal and tidied it up with an orbital.
Router with roundover would work if the radii matched.
You are absolutely correct about the schooner rudder having a more extreme leading edge than the Skerry daggerboard. That's because they have different functions. The rudder swings 60 degrees left and right of the centerline, the daggerboard doesn't, for example. That's what determines the required foil shape.
Laszlo
RE: Shaping the daggerboard
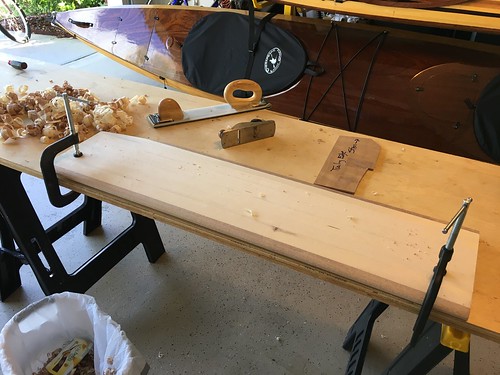
+1 on Laszlo's comments. I used a power planer to create a "blank" that was the correct thickness (first 4 pictures), then switched to a hand plane to fine tune the shape. Sanding was with a long board before RO. Here is pictorial of the foils for my Goat.


RE: Shaping the daggerboard
» Submitted by Laszlo - Sun, 7/2/23 » 9:33 PM
Yes, otherwise known as a NACA symmetrical airfoil shape.
Laszlo