Applying Decorative Fabrics
FinishingThere's nothing new under the sun, whether it's boats or anything else. Surfboard builders have been incorporating colorful fabrics into their boards as long as fiberglass existed. Boatbuilders have been slower to pick up on this neat trick. But it strikes us as a really unique way to personalize any boatbuilding project without running up the hours that you do with wooden inlays or cedar strips.

All you need is a fabric store. A good one will have an astonishing array of colorful, original prints. You can get bright and splashy, or something understated and geometrical. Fabric designers are more clever with these things than the rest of us. Try to select thin fabrics----thick fabric is hard to sandwich between the wood and the fiberglass---and don't use anything with embroidery or heavy selved edges.

We decorated our display model Kaholo SUP with fabric, and snapped photos along the way. Our colleague Matt found some groovy sea turtle fabric.

After careful study of the design, we draped the fabric over the deck and centered the design.

Use a ballpoint pen and a tri-square to mark a cut line parallel to the edge of the deck, if that's the design you have in mind. (Don't use a felt-tip marker---that type of ink might run when epoxy is applied.)

Use a sharp pair of scissors. It's important to cut smooth, fair lines. Fabric is cheap so start over if you get a jagged line.

Our design called for an arc on the base of the bow triangle. We folded the fabric on the centerline...

...and took the curve off of a kayak coaming ring.

Cutting both sides at once yields a symmetrical design.

We used the radius on this marker to soften the points.

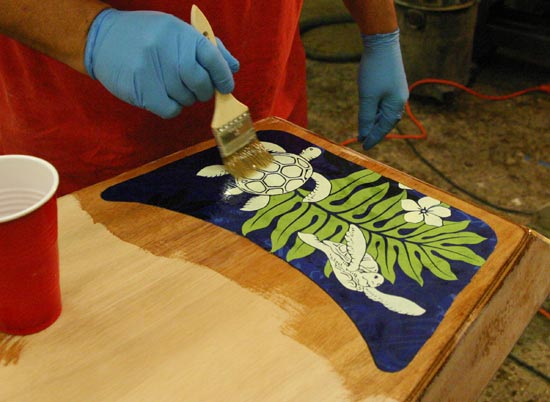
Time to epoxy the fabric to the bare wood. You'll need to glue down the fabric and apply the fiberglass top layer at the same time, so have everything ready. Your fabric is almost certainly tightly woven, so the epoxy won't saturate as easily. Coat the plywood thoroughly before you place the fabric.

Position and smooth the fabric. This is the stern design.

Brush on more unthickened epoxy until the fabric is completely saturated.

Squeeze out air bubbles and excess epoxy. You don't want the fabric to "float" off the plywood. This tends to require more work than wetting out fiberglass because of the tight weave in the fabric.

Now drape the entire deck with fiberglass and wet it out with epoxy in the usual fashion. If you selected fairly thin fabric, it won't be hard to make the edges nearly imperceptible beneath fiberglass. It will take at least three coats of epoxy to fill the weave of the fiberglass. Then you can sand and varnish. We applied four coats of varnish to our Kaholo.

Were the edges of your decorative fabric rough? Yeah, so were ours. It's hard to keep the edge from fraying. We went to an auto parts store and for a couple of dollars bought a roll of stick-on vinyl striping. It's so thin that it looks like it was painted on. The striping, applied atop the varnish as a border to your fabric design, looks great and covers any rough or uneven edges.


For tight curves and details, you may need to cut short lengths of tape into arcs with a razor.

Here's a finished corner. Pretty nice.

CLC's finished Kaholo SUP.