Boatbuilding Tips
Our vast collection of boatbuilding tips, drawn from decades of experience in supporting backyard boatbuilders.

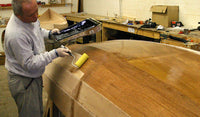

Padding Seats
It's no secret that everyone's, um, tush is different, so here are three ways anyone can get a well-padded and comfortable seat. Method 1 - Cut two layers of 1/2"...
Padding Seats
It's no secret that everyone's, um, tush is different, so here are three ways anyone can get a well-padded and comfortable seat. Method 1 - Cut two layers of 1/2"...
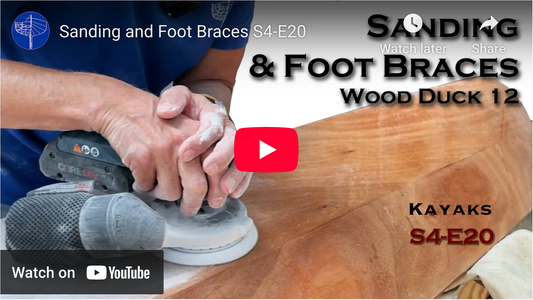
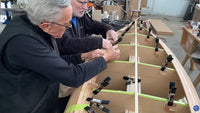
Sanding & Foot Braces (S4 E20)
Do You Hate Sanding? Bob Emser doesn't! Sanding epoxy on a kayak is more than a step in construction—it is a quiet act of reflection. What begins as a practical...
Sanding & Foot Braces (S4 E20)
Do You Hate Sanding? Bob Emser doesn't! Sanding epoxy on a kayak is more than a step in construction—it is a quiet act of reflection. What begins as a practical...
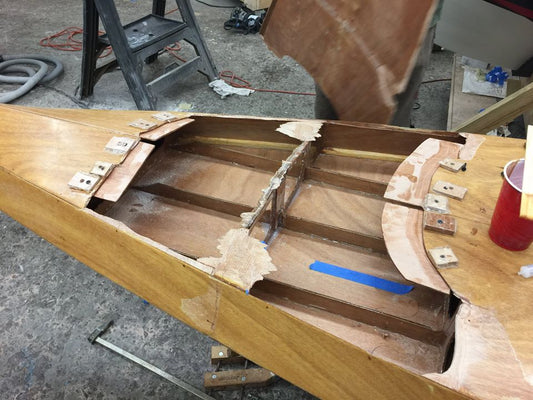
Surviving a Wooden Boat Catastrophe
This demo model Kaholo 12-6 got crunched. Most of us wrote it off, but CLC boatbuilder Travis Guthrie said he could make it right. Can he? There was a gaping...
Surviving a Wooden Boat Catastrophe
This demo model Kaholo 12-6 got crunched. Most of us wrote it off, but CLC boatbuilder Travis Guthrie said he could make it right. Can he? There was a gaping...

Sharpening Tools
One of the first things I do when teaching a boatbuilding class is to show my students how to sharpen their block planes and other edged tools. Watching a roomful...
Sharpening Tools
One of the first things I do when teaching a boatbuilding class is to show my students how to sharpen their block planes and other edged tools. Watching a roomful...
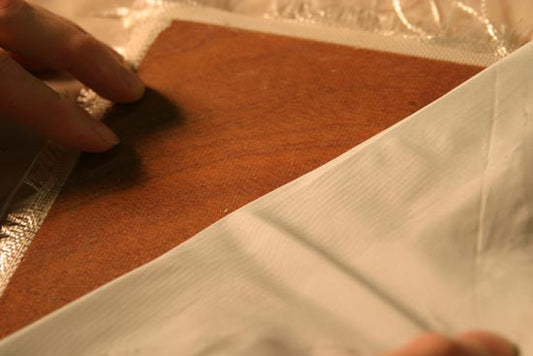
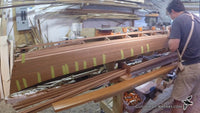
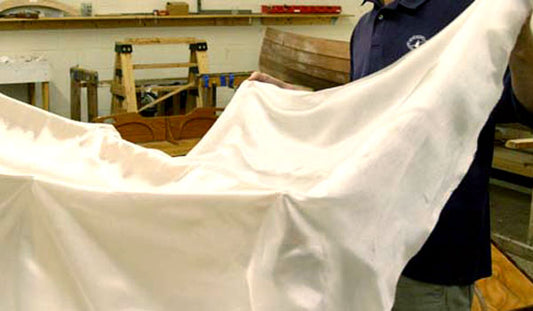
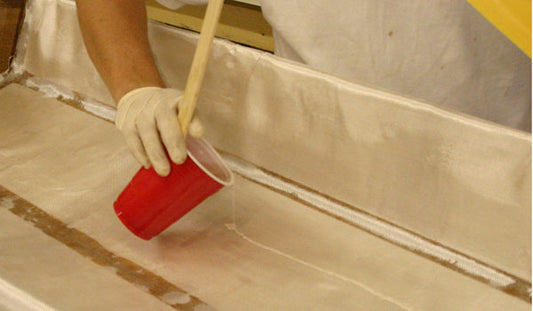
Peel Ply for Smooth Fiberglass Surfaces
We’ve written before about the challenge of getting smooth surfaces with epoxy and fiberglass. It takes at least three coats of epoxy to “fill the weave,” and then hours of...
Peel Ply for Smooth Fiberglass Surfaces
We’ve written before about the challenge of getting smooth surfaces with epoxy and fiberglass. It takes at least three coats of epoxy to “fill the weave,” and then hours of...
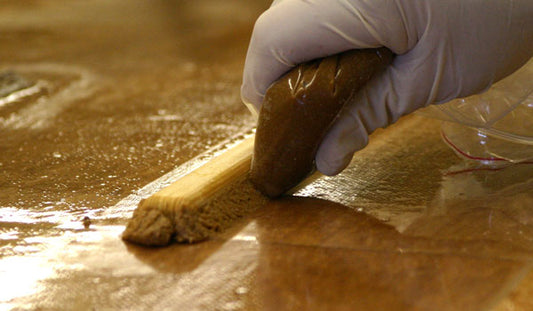
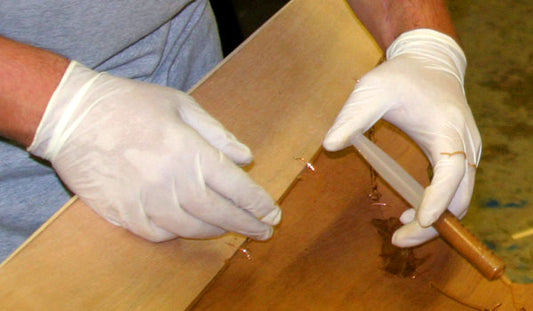
Pastry Bags for Epoxy Fillets
In stitch-and-glue boatbuilding. epoxy "fillets" are what hold everything together. Whether you are filling the seams on a Lapstitch™ hull or you are bonding bulkheads to the hull shell, you'll...
Pastry Bags for Epoxy Fillets
In stitch-and-glue boatbuilding. epoxy "fillets" are what hold everything together. Whether you are filling the seams on a Lapstitch™ hull or you are bonding bulkheads to the hull shell, you'll...
Safe Boatbuilding (Part 1) by Dave Carnell
By Dave Carnell [The guys at MAS Epoxies turned us on to Dave's excellent safe-boatbuilding essay, and it is used here with Dave's permission.] Chemicals are commonly conceived as a...
Safe Boatbuilding (Part 1) by Dave Carnell
By Dave Carnell [The guys at MAS Epoxies turned us on to Dave's excellent safe-boatbuilding essay, and it is used here with Dave's permission.] Chemicals are commonly conceived as a...
Fiberglassing
Fiberglass is just what it sounds like: very fine strands of glass, just like the stuff in a window pane, woven into a cloth that vaguely resembles white burlap. Bonded...
Fiberglassing
Fiberglass is just what it sounds like: very fine strands of glass, just like the stuff in a window pane, woven into a cloth that vaguely resembles white burlap. Bonded...
Epoxy Mixer
Professional boatbuilders agree that 90 percent of epoxy problems are caused by insufficient mixing. Well, we mix a lot of epoxy at CLC, so we made this neat little epoxy...
Epoxy Mixer
Professional boatbuilders agree that 90 percent of epoxy problems are caused by insufficient mixing. Well, we mix a lot of epoxy at CLC, so we made this neat little epoxy...
CLC Epoxy Tips and FAQ
What is the Mix Ratio? - The MAS mix ratio is 2:1 for Resin to Hardener. That ratio stays constant even when the hardeners are custom blended. If using calibrated...
CLC Epoxy Tips and FAQ
What is the Mix Ratio? - The MAS mix ratio is 2:1 for Resin to Hardener. That ratio stays constant even when the hardeners are custom blended. If using calibrated...
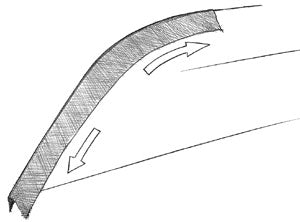
Bias-Weave Fiberglass
If you've ever struggled to make a piece of fiberglass tape or cloth lay smoothly over the sharp bow or stern of a boat you need to learn about bias...
Bias-Weave Fiberglass
If you've ever struggled to make a piece of fiberglass tape or cloth lay smoothly over the sharp bow or stern of a boat you need to learn about bias...
Avoiding Epoxy Fisheyes
If you've ever applied a coat of epoxy that formed "fisheyes" (round craters) or beaded (like water on a freshly waxed car), you know how hard it is to sand...
Avoiding Epoxy Fisheyes
If you've ever applied a coat of epoxy that formed "fisheyes" (round craters) or beaded (like water on a freshly waxed car), you know how hard it is to sand...
"Filling the Weave"
Without epoxy, fiberglass is just an itchy, loosely-woven fabric that you can unravel in your fingers. Saturated and bonded to plywood in a hard matrix of marine epoxy, fiberglass cloth...
"Filling the Weave"
Without epoxy, fiberglass is just an itchy, loosely-woven fabric that you can unravel in your fingers. Saturated and bonded to plywood in a hard matrix of marine epoxy, fiberglass cloth...
![Strip Planking 35: Laminating the Coaming Lip [video]](http://clcboats.com/cdn/shop/articles/tip-35.jpg?v=1729125153&width=533)
Strip Planking 35: Laminating the Coaming Lip [...
Nick Schade writes: I make the lip of my coaming (the part that holds on the spray skirt) by laminating a stack of thin laminations around the coaming riser (the...
Strip Planking 35: Laminating the Coaming Lip [...
Nick Schade writes: I make the lip of my coaming (the part that holds on the spray skirt) by laminating a stack of thin laminations around the coaming riser (the...

Strip Planking 34: Applying a Fill Coat [video]
Nick Schade writes: A "Fill-Coat" is what I call the coat of epoxy applied after fiberglassing which is intended to fill in the weave texture of the fiberglass so that...
Strip Planking 34: Applying a Fill Coat [video]
Nick Schade writes: A "Fill-Coat" is what I call the coat of epoxy applied after fiberglassing which is intended to fill in the weave texture of the fiberglass so that...
![Strip Planking 33: Installing a Solid Outer Stem [video]](http://clcboats.com/cdn/shop/articles/tip-33.jpg?v=1729123997&width=533)
Strip Planking 33: Installing a Solid Outer Ste...
Nick Schade writes: There are a couple ways to add an external stem to a kayak. While I typically use thin laminations stacked and bent and glued in place, on...
Strip Planking 33: Installing a Solid Outer Ste...
Nick Schade writes: There are a couple ways to add an external stem to a kayak. While I typically use thin laminations stacked and bent and glued in place, on...
![Strip Planking 32: Joining the Deck and Hull and Taping the Inside Seam [video]](http://clcboats.com/cdn/shop/articles/tip-32.jpg?v=1729123758&width=533)
Strip Planking 32: Joining the Deck and Hull an...
Nick Schade writes: Joining the Deck and Hull One of the more frequent questions I get is; "How do you put the deck back on the hull? How do you...
Strip Planking 32: Joining the Deck and Hull an...
Nick Schade writes: Joining the Deck and Hull One of the more frequent questions I get is; "How do you put the deck back on the hull? How do you...
![Strip Planking 31: Smoothing the Hull Interior [video]](http://clcboats.com/cdn/shop/articles/tip-31_bc907da2-f971-4312-b1c0-f2a7335ee978.jpg?v=1753889417&width=533)
Strip Planking 31: Smoothing the Hull Interior ...
Nick Schade writes: The concave shape of the interior is more difficult to smooth than the exterior. The easiest tool to use is a scraper. These scrapers are not card...
Strip Planking 31: Smoothing the Hull Interior ...
Nick Schade writes: The concave shape of the interior is more difficult to smooth than the exterior. The easiest tool to use is a scraper. These scrapers are not card...
![Strip Planking 30: Glassing the Interior of the Coaming [video]](http://clcboats.com/cdn/shop/articles/tip-30.jpg?v=1729123303&width=533)
Strip Planking 30: Glassing the Interior of the...
Nick Schade writes: To this point I have only glassed the outside of the coaming. Now that I have applied carbon fiber to the interior of the hul I can...
Strip Planking 30: Glassing the Interior of the...
Nick Schade writes: To this point I have only glassed the outside of the coaming. Now that I have applied carbon fiber to the interior of the hul I can...
![Strip Planking 29: Laying Carbon Fiber Cloth on the Deck Interior [video]](http://clcboats.com/cdn/shop/articles/tip-29.jpg?v=1729123057&width=533)
Strip Planking 29: Laying Carbon Fiber Cloth on...
Nick Schade writes: Laying carbon fiber is not that different from fiberglass accept that it is black, and stays black. Where fiberglass starts white and becomes transparent when saturated with...
Strip Planking 29: Laying Carbon Fiber Cloth on...
Nick Schade writes: Laying carbon fiber is not that different from fiberglass accept that it is black, and stays black. Where fiberglass starts white and becomes transparent when saturated with...
![Strip Planking 28: Smoothing the Deck Interior [video]](http://clcboats.com/cdn/shop/articles/tip-28.jpg?v=1729121716&width=533)
Strip Planking 28: Smoothing the Deck Interior ...
Nick Schade writes: Unlike the outside where sanding is easy, the inside can be harder to to smooth. I find scrapers are the easiest way to deal with the concave...
Strip Planking 28: Smoothing the Deck Interior ...
Nick Schade writes: Unlike the outside where sanding is easy, the inside can be harder to to smooth. I find scrapers are the easiest way to deal with the concave...
![Strip Planking 27: Fiberglassing the Exterior of the Coaming [video]](http://clcboats.com/cdn/shop/articles/tip-27.jpg?v=1729121404&width=533)
Strip Planking 27: Fiberglassing the Exterior o...
Nick Schade writes: After installing the riser, I glassed the outside, reinforcing the coaming and securely attaching it to the deck. The riser was initially installed using hot-melt glue which...
Strip Planking 27: Fiberglassing the Exterior o...
Nick Schade writes: After installing the riser, I glassed the outside, reinforcing the coaming and securely attaching it to the deck. The riser was initially installed using hot-melt glue which...
![Strip Planking 26: Installing the Coaming Riser [video]](http://clcboats.com/cdn/shop/articles/tip-26.jpg?v=1729121160&width=533)
Strip Planking 26: Installing the Coaming Riser...
Nick Schade writes: The coaming "riser" is what I call the vertical part of the combing around the cockpit. This is made of the same wood I made the rest...
Strip Planking 26: Installing the Coaming Riser...
Nick Schade writes: The coaming "riser" is what I call the vertical part of the combing around the cockpit. This is made of the same wood I made the rest...
![Strip Planking 25: Fixing a Broken Seam [video]](http://clcboats.com/cdn/shop/articles/tip-25.jpg?v=1729120781&width=533)
Strip Planking 25: Fixing a Broken Seam [video]
Nick Schade writes: While rolling out the fiberglass before glassing the deck, I ended up cracking a section on the back. The break was along a glue line. To fix...
Strip Planking 25: Fixing a Broken Seam [video]
Nick Schade writes: While rolling out the fiberglass before glassing the deck, I ended up cracking a section on the back. The break was along a glue line. To fix...