
Builders' Forum |
|
| ↓ Scroll to Last Comment ↓ | Forum Guidelines | Builders' Forum | |
I cut out the front hatch of my Shearwater 17 S & G first and kind of screwed it up. The aft hatch was a lot easier. The aft hatch fits great and I could not be more pleased. The front hatch has about a 1/16 of an inch gap on one side. Also one of the corners is not as round as I would have hoped. I used the Bonsai saw and found that not going slow enough has its consequences. I cut a little to quick and got off my line. I could put a small fillet in the gap I have on the one side. I am open to any suggestions anyone might have. Might be I just have to live with my error. Disappointing at this stage to have done so well with everything else and have a hatch I am not pleased with. I am sure I not the first to get it not quite right so I hope there are some remedies I might try to approve the appearance and get a good fit. Thanks, Mark
18 replies:
RE: Hatch screw up
One other thing, I know when I cut the hatches out on my Shearwater, I wasn't 100% happy. I could point out every little minor irritating imperfection right now. But as the painful memories of that terrifying ordeal fade into the past, I can relax a little more, see past the little flaws and if I de-focus my eyes slightly, think, hey, that's not so bad!
--
Ogata (eric)
RE: Hatch screw up
I appreciate your response. Like most folks I desire the the finished product to look really good. I think overall, despite my mistakes, the boat will be an eye catcher. Like you say, if you are the builder each little imperfection stands out. My main goal is to get it on the water and have fun, regardless of construction mishaps. One of my temporary deck molds matches the hatch so I may try and cut a sliver, as you suggest, to match up with th ehatch.
RE: Hatch screw up
It would help everyone to help if you could post pics of stuff like this.
Anyway, with aesthetics in mind trying to hide everything, without seeing a pic, and from your description on a 1/16" gap on only one side.......what comes to mind is adding a small amount of clear epoxy to the boat hatch sill area on the opposite side. This will shift the hatch over and close the gap on one side and opening a slight gap on the other side. It is not the gap that makes it stand out, it is the fact there is a gap bigger on one side. Adding the epoxy to the other side will make a gap on each side that is even. I think. From the picture in my mind from your description, this should work.
RE: Hatch screw up
Mark,
One thing to keep in mind is that there's such a thing as too tight. You need to have enough room to allow for the deck and hatch cover edges to both be thoroughly coated with epoxy. You also need some room for just using the hatch. A completely invisible hatch is very impressive, but can be difficult to use. Getting it lined up so it can be closed can be a nuisance if the fit is too tight, and can result in a lot of banging of the edges (especially on rectangular hatches), which can wear off the epoxy and lead to dark water stains.
So another thing to consider is maybe trimming the whole hatch to get an even gap, rather than trying to fill the one you have. Without a picture I'm not sure which to recommend
Finally, the ancient Greeks used to deliberately include a flaw in every sculpture so that their gods wouldn't strike them down for hubris. If all else fails, you could consider this anti-hubris insurance.
Have fun,
Laszlo
RE: Hatch screw up
Thanks All, I will post some pictures tonight. I believe it would be helpful for others to see and learn from my error and be better able to provide possible solutions
RE: Hatch screw up
I accept the challenge, L. But pls allow three weeks for delivery: won't be easy to find a word to top "hubris", let alone work it into a post.
RE: Hatch screw up
I tend to go for the quick and easy fix. If it is an uneven line get out the rasp or even some gritty paper and smooth things out. Then apply the 3 foot rull or even a 6 foot rull. The important thing is that I would be very surprised if anyone else notices it and it certainly will not make to boat vear to one side or sink.
Happy paddling.
RE: Hatch screw up
http://www.flickr.com/photo_settings.gne?id=3239336727&photos_url=%2Fphotos%2F34909257%40N07%2F
I've uploaded the photo and am attempting to add the URL, but am not sure if this is right so I'm testing to see if it works.
In the chance it does, these are the photos. As you can see one side of the hatch is not cut well but overall not too bad. I do think perhaps they will be too tight of a fit once glass and epoxy is added. I cut a little too far on the sheer panel and it was uneven. Not sure what I need to do at this stage. I am wondering if I need to expand the space all around the hatch or go with what I have. I attempted to use the flickr wedsite to post the photos but am not sure how to post them.
RE: Hatch screw up


RE: Hatch screw up
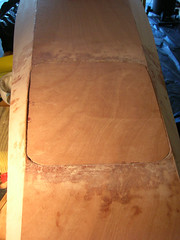
I can see you veered off course and cut your sheer panel.
If you try to shift the hatch over, it would mean having to take away some wood, trimming it near the corners. I would not do this.
If you try to backfill the sheer panel to close the gap, then you would introduce a 3rd to the already 2 different colors of wood you have with the okoume sheer panel and sapele deck panel. A patch or filler would not match up to either. I would not go there either.
Along the lines of what Lazlo said of not having a hatch fit too tightly, you could maybe trim the other 3 sides a little bit to even things out and you wouldn't have to worry about the hatch being to tight. Evening things out is what will make the slight error not stand out, it will go away. So that is what I would do here if it was my boat, just slightly sand the other 3 sides to even things out and then forget about it and move on.
Here is a pic of my rear hatch during the build. They don't cut out and fit perfectly, we make adjustements during fitting. The end product later on does appear perfect to most, never to us 100% as we know every tiny flaw in the boat. Your boat will turn out fine.


RE: Hatch screw up
Thanks Fishbuster and Laszlo for your suggestions. It is going to be a nice day here so I plan to spend time this aftrenoon sanding the excess epoxy off the hatch cut outs. I like your suggestion of sanding back the other three sides to some degree to make up for the uneven side. I think the final result will turn out fine. When I cut that side I did not realize I was cutting so far down the sheer until after the fact. I plan to build another boat in the future and while I hate making these errors, I can see where it gives me experience to on the learning curve of boat building.
RE: Hatch screw up
When I cut the hatches on my Shearwater I couldn't find a narrow blade for my saber saw, so used one that was too wide. The result was going way off on the first corner, leaving a tab on the hatch cover. I filed the drain channel under this tab, which makes it easier to lift. Now that it's finished, nobody but me sees the error. By the time you add the epoxy to the edges, your gap will disappear anyway. I used a Dremel grinder to cut away excess epoxy to make the hatches fit properly.
RE: Hatch screw up
Just an update. I used a Dremel tool and lightly sanded the other three sides as Fishbuster suggested. It actually looks pretty good. Once I put on the glass and epoxy most people would not be able to notice any gap. I plan to make a gasket from Minicel Foam for the seals, as some have suggested doing, and should be able to fit it adapt to any uneven areas that may develop. Thank you for all the suggestions. Mark
RE: Hatch screw up
For weatherstrip, the large black stuff that came with the kit went into the trash as it clearly is not for the shearwater. I used thin white waterproof stripping from home depot and did not have to trim it. It was a perfect fit into the sill. I also did not file one corner as suggested in the kit instructions. I think that looks bad and after using my kayak for a season, it is just not needed.
Alos, in the future on your next boat for cutting hatches....there are so many choices for jigsaw blades it will make your head spin. They have special blades that are designed for making turns while you are cutting. This made my hatches come up near perfect and you can see what you are doing with the skinny blades.
I am glad things are working out for you. :-)


RE: Hatch screw up
» Submitted by ogata - Thu, 1/29/09 » 10:00 PM
Perhaps you could use a sliver of similar colored wood to make a neat patch? Possibly you could even use some contrasting colored strips around the lip of the hatch to straighten out any ragged lines in an attractive manner? If the area is small enough, a little fillet that was carefully sanded over to blend in might not really be very noticable.
--
Ogata (eric)