
Builders' Forum |
|
| ↓ Scroll to Last Comment ↓ | Forum Guidelines | Builders' Forum | |
I'm a bit confused. The instructions say to attach the sheer clamp to the inside of the top part of the hull. That's clear. But then it says to bevel it in the diagram with different degrees of rolling bevel. Elsewhere I saw it was ok to add the sheer clamp later if desired. So now I'm confused if I should bevel the top of the hull at 30 degrees and if that 30 degrees includes beveling the sheer clamp, which would pretty much take off the overhang in the pictures.
appreciate if anyone can shed some light on this. I've got the bottom part of the hull beveled but stopped when I realized this wasn't clear to me.
Thanks in advance!
14 replies:
RE: Why bevel top of hull?
Bonding sheer clamp to the uppermost panel in most cases will give it some stiffness lacking in an unsupported plywood edge. This stiffness may facilitate that panel taking the shape desired of it, once it's in place.
Beveling sheer clamp and upper panel edge together, to bring them to a shape that then matches what the deck will take on – once it's time to bond the deck into position – gives the greatest bonding area to that important structural joint.
If the plans suggest otherwise, there may be a valid reason for this specific design that features a strip-built deck built up first on the completed hull, then removed for fiberglassing the underside before bonding it into it's final position once the temporary frames are removed.
Do the instructions have you adding the sheer clamp after temporary frames are removed? Or are all the frames notched so the sheer clamps can be placed with the frames in place before the deck is assembled?
RE: Why bevel top of hull?
The frames are notched for the sheer clamp. I would just hold off on beveling until I go to put the deck on, but then it would be difficult to bevel once I wire the supports to the sides and also doing it after fiberglass doesn't make sense either. It's really unclear in the guide. I just wish I knew if I was beveling 30 degrees from the outside or 30 degrees from the outer edge of the sheer clamp. If it is from the outside, then it doesn't make sense to have an overhang as called for since that will be cut off.
RE: Why bevel top of hull?
i don't have the instructions available but i think there are two ideas that are getting conflated. 1) the bonding surface of deck/hull and 2) how to finish the deck.
first, the bonding surface, in this boat is a deck glued to a sheer clamp. so to maximize the surface and ensure no gap between the deck and hull....based on my experience in several builds, will find it easiest to install the sheer clamps slightly proud of the top of the upper panel edge and then plane the sheer clamp/upper panel edge to match the arc of the forms in that area. it's called a rolling bevel becuase the arc of the forms is not constant at all forms...so you smooth the transition as you plane form-to-form. while the manual says you can do this later....i think its just easier to do at this step. so now you have a bonding surface that the deck/hull interface with be nice and tight.
second, finishing the edges of the deck. so when you build a hybrid, you will have the 1st row of strips along the sides slightly proud (e.g., overhang) of the sides of the hull (i shoot for about 1 mm). when you are done with the deck, now, and after you glue it to the hull, you now need to create a smooth transiton from the outside side of the hull to the top of the deck. at this point you can round over the sides of the deck and blend the outermosts strips on the deck smoothly into the hull sanding away the 1 mm overhang.
i hope that helps
h
RE: Why bevel top of hull?
SDillard, hspira's post adds some good info on this topic.
May I ask is this your first build? We're here to help 'fill in the holes' what a build manual sometimes leaves open for builders.
With experience builders gain confidence in thinking through what's sometimes left for us to figure out for ourselves. There's help here! Come back if there's more that puzzles you (besides puzzle joints theyselves...) & remember there's no such thing as too much information when it comes to describing what's challenging you!
RE: Why bevel top of hull?
Appreciate the responses. I get that that I will be attaching the deck and that it relies on the sheer clamp for stability / attaches at that point. Since I don't think my question is clear, I made a diagram. I am trying to figure out if the bevel goes through the hull plywood (option A) or just through the sheer clamp (option B). And if it is Option A, then other than reducing the amount of sheer clamp, it isn't clear to me why it should overhang (other than the maximum reasonable amount to bend the sheer clamp).
As a side note, the diagram is missing a figure for the top of the upper hull and doesn't say what degree it is. However, comparing to the other images and using a protractor, it's clear it is 30 degrees and is constant across the top (not a rolling bevel). But it would be nice to fix the diagram.
Yes, this is my first time. I've done other woodworking but first time building a boat of any kind.
Option A:

Option B:

Thanks again and hope that is clearer.
RE: Why bevel top of hull?
Good diagrams. Glad you figured out how to post 'em here (I've had limited success so I'm envious!).
Having never built a Shearwater Hybrid I can't say with authority which is correct, yet my one instance of beveling a sheer clamp has me thinking the bevel should leave the inner edge of the clamp higher than the outermost edge of the hull.
Is your deck assembly supposed to be concave (curved inward) on the bottom? From the pics on that kayak's web page here, it appears to be. Meaning the sheer clamp should be beveled so that its shaped surface closely fits the as-built shape of the deck it's to be bonded to. Pic A is most correct but the bevel angle is backwards; a 'proud' clamp is left high so that when it's beveled properly, the inside edge is higher than the outside. And it's typical to take a minute shave off the top edge of the hull panel the clamp is bonded to, but it's not absolutely necessary. Any minor gap will be filled with thickened epoxy squeeze-out once deck bonding's been done.
RE: Why bevel top of hull?
Something in these may be of help to you:
https://www.clcboats.com/shoptips/stitch_glue/boatbuilding_terms.html
RE: Why bevel top of hull?
Thanks for the patience - I think I get it now. In the guide, all the rolling bevels are on the inside (effectively, 0 degrees is no bevel and you are cutting away the inside portion), but on the top it is reversed and, it is 30 degrees measured from the inside intead of from the outer edge.This makese sense to me but is really unclear in the guide. Thanks for all the help. Please correct if I misunderstood, of course.
RE: Why bevel top of hull?
I think you've got it too now.
But before you start shaving your sheer clamps, note how the curve of the tops of the frames meets the edge of the top panel at the clamps.
That angle - between the frame tops and the outer edge of the panels - is what you want to bring to the tops of the sheer clamps also. The idea is that, when you're building then bonding your deck to the hull, the clamps provide a close-fitting mating surface. Without it, the edge of the panels alone would be too thin for a proper structural joint.
Post some pics of your build next time you visit here.
RE: Why bevel top of hull?
hi sdillard,
apologies but i looked at your pictures and now i am confused. the shear clamps are in the inside of the hull.....your picture seems to suggest they are on the outside?
anyway, i have made the following picture which i hope is clear about what i think you need to be doing:
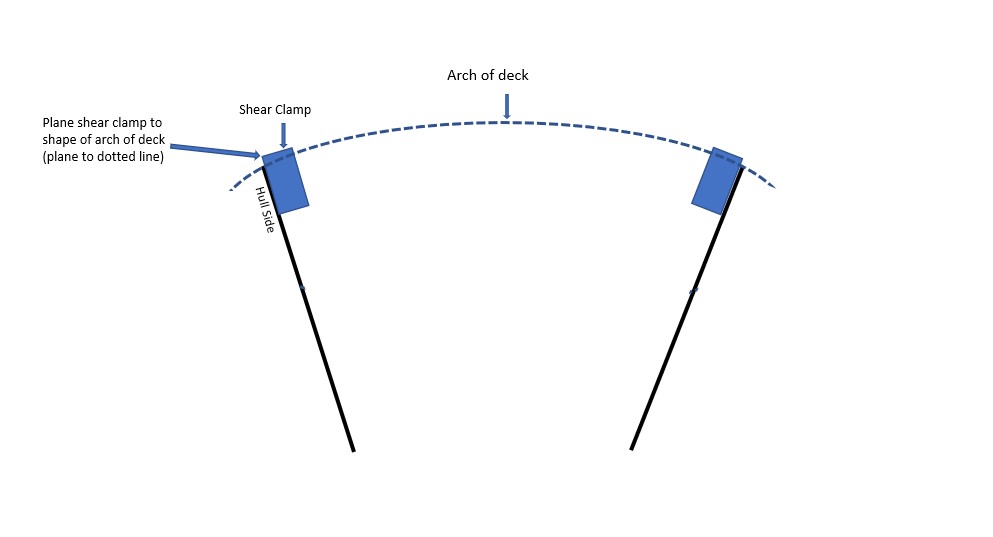 so the temporary forms (upon which you will build the strip deck) is the 'arch of the deck' in this picture. the shear clamps are the blue blocks glued to the inside sides of the hull which are the thick black lines. so you plane the shear clamp per the arch of the deck which changes depending on where you are (hence the rolling bevel). the back of the deck will be relatively flat (not a lot of arch) and it will be more arched in the front section of the kayak.
i hope this makes it really clear.
h
RE: Why bevel top of hull?
SDillard,
hspira is right. According to your drawings you have it backwards. Here's a picture from the Shearwater construction gallery that shows how it should be.

The sheer clamps go on the inside of the hull, slightly proud of the hull. They are planed to have a rolling bevel that matches the shape of the bottom of the deck so that the deck will have a matching surface to bond to. Since the deck shape is set by the forms, the bevel must match the forms at each station. Inbetween forms it should smoothly transition from one form to another.
CLC's video shows this process for a Cheasapeake 17 starting at 1 minute 26 seconds in.
Laszlo
RE: Why bevel top of hull?
Yes my sheer clamps are on the inside but I can see how that wasn't clear from my diagram. And I am going to plane as the diagram from hspira above shows. So I feel good overall.
But I still think the manual is really unclear here. If I followed it as it is written I would end up attaching to the plywood of the hull and not the sheer clamp, as it shows a constant 30 degree bevel across the top.
Thanks again for all the help. I'm sure I'll be back soon and will post pictures to be clearer.


RE: Why bevel top of hull?
» Submitted by Laszlo - Sun, 9/11/22 » 7:03 AM
It'd be really helpful if we knew which model of boat you're building.
Laszlo