
Builders' Forum |
|
| ↓ Scroll to Last Comment ↓ | Forum Guidelines | Builders' Forum | |
Hello,
I am in the process of cutting the forms for the Night Heron Hybrid and would like to connect with someone who has built one. I have a couple of questions and would greatly appreciate the advice of someone who has gone through the process. Thank you so much!
Cloyd Barth
19 replies:
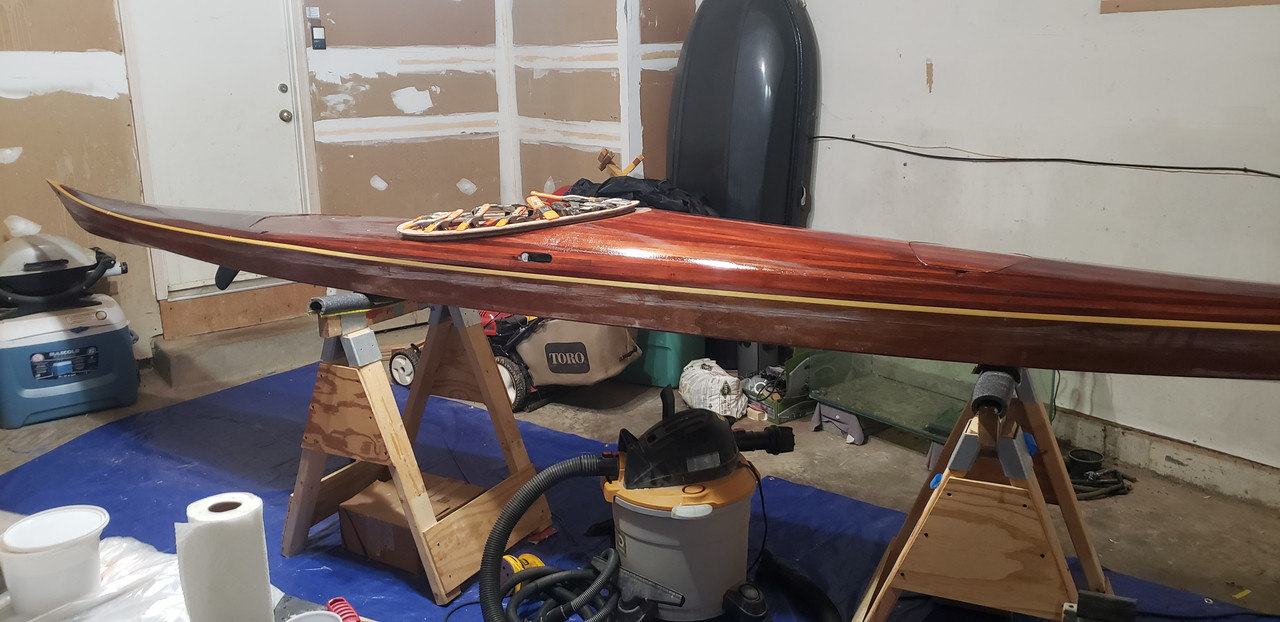
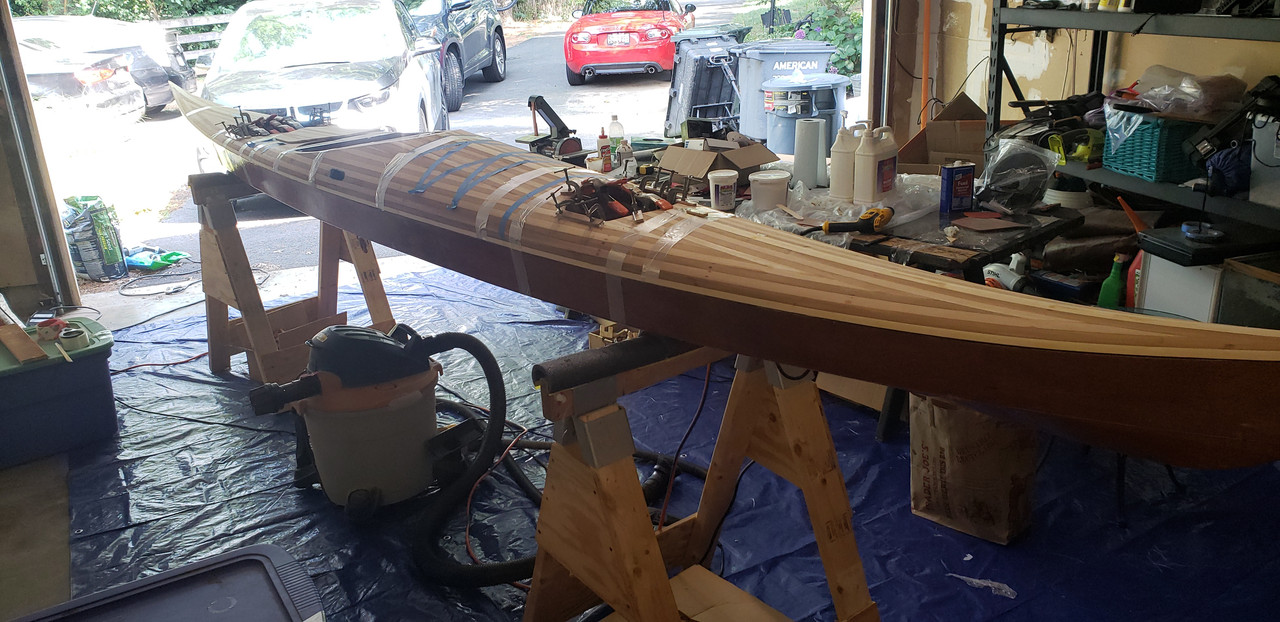
RE: Night Heron Hybrid
and here is a slightly different angle and after adding perimeter liness and toggles. 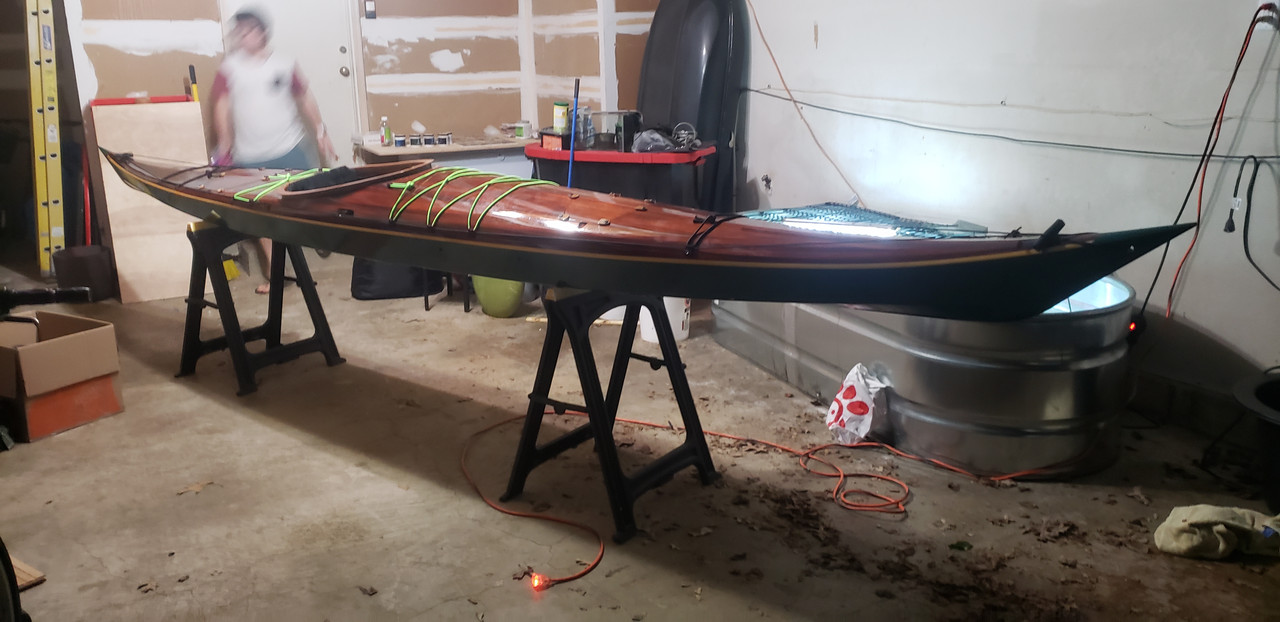
RE: Night Heron Hybrid
So great to get your response! You have crafted a tremedous Kayak. Very nicely done!
I just realized I have left the manual at home so I might have to hold off on the specific nature of my questions. I know for one, I am having some difficulty identifying the "combing" segments for building up the cockpit on the blueprint. It is simply a case of replicating the cockpit template four times to get the desired height of 16mm? When laying these up is the interior core of the marine plywood then exposed? How is that appearance wise?
Also, I am having some difficulty determining the height of the six exterior hull forms to hold the bottom in place. I can identify the contour shape [top] but cannot determine the height of each of these. I think I may be missing something that may, or may not, be obvious.
I really appreciate you gettign back to me on this. I am grateful for any assistance you can offer. I may be back with more questions...
Thank you!
Cloyd
RE: Night Heron Hybrid
Cloyd,
are you building from plans or kit? that will be helpful.
also, you will want to learn how to post pictures. you can use the website https://postimages.org/ as a place to post and then you can link them in here and share them.
h
RE: Night Heron Hybrid
Hi Cloyd,
ok, what will be useful is to snap a picture of the part of the plans or manual that you are focused on as part of your questions.and post the picture with the questions.
i built from a kit which did not include plans - just the build manual and the boat had been sitting around for a long time before i built it so the manual was over 10 years old. while the design has not changed, i am not sure if they updated the manual.
but let me try to answer your questions as best as i understand it:
the combing is a combination of the combing sill which is the part of the deck the combing sits on, the combing risers/spacers which sits on the sill and creates a tube reaching upward and the coaming itself which sits on the spacers/risers and is wider than the spacers so it forms a lip which you can use for attaching a skirt. if you are building with 4 mm okoume, you will need to replicate the spacer/riser template 4 x to get the 16 mm gap between the deck and the coaming itself which is also cut out of 4mm ply. this youtube video shows this pretty well:
https://www.youtube.com/watch?v=AeCc0UMABsQ&list=PLU0lZs6TA-Vyo59fMMRB1pGSUmeEXlfgW&index=15 .
in the video he is using spacers that are 8mm thick so he only uses two of them.
for the six exterior forms, the plan will typically assume you are building on a flat surface so the forms, if sitting on a flat surface at the correct location (station) on the boat, will hold the hull in the correct shape. the boat has a certain amount of rocker so the ends bow upward so you will see the forms holding the bow/stern will hold it higher (from a flat surface) than the forms in the middle of the boat.
i hope that helps. btw...on the you tube i included, it's actually part of a ten part video seriers of building a shearwater hybrid.....which is very similar to the night heron hybrid. so i recommend the viewing the complete series.
h
RE: Night Heron Hybrid
below is a picture of the coaming 'sandwich' being organized on the boat. again, the bottom is the sill, the middle is the spacers/riser and the top is the coaming.
RE: Night Heron Hybrid
with respect to your question on looks, the interior of the marine plywood will be exposed. i think it looks fine. from the outside of the boat it is mostly hidden under the coaming rim so you don't really see it, from the inside i think it looks fine as well.

if you don't like the look you, can of course, make the risers out of cedar or some other material that you like.
RE: Night Heron Hybrid
Wow! I really appreciate the comprehensive nature of your response as this helps a great deal.
Those links will definately come in handy!
I am just heading into class but the one lingering question in regards to the exterior hull forms. Is there a uniform height of these pieces? I know there is a variance in the contour that the kayak fits into and I have that profile. I am just having a hard time determining the height of these pieces, or do I just wing it and establsih this as I go to offer the stability it requires?
I am sure that there will additional future questions and I really hope to I can continue to capitalize on your expertise!
Again, super awesome job on yours!
Stay well!
Cloyd Barth
RE: Night Heron Hybrid
Cloyd,
please see the following youtube video:
https://www.youtube.com/watch?v=Nc_jBNe9s6g
at about 1 mintue 50 seconds in it shows how the outside forms work on a flat surface. so i don't know how they show it in the plans.....but they should have a clear location on the kayak and a clear distance to a flat/floor baseline.
i hope this helps sort out your forms question.
howard
RE: Night Heron Hybrid
Hi Howard,
Thank you again for all of your help. I am sorry that I did not get back to you sooner but we are currently heading into a "Code Red" scenario up here in Winnipeg, Manitoba, Canada. As a High School teacher that means numerous moving parts as we move from in-class to virtual learning in the coming weeks.
The video recommendation was an immense help. One last question [although I can't promise that] did you install the Aft bulkhead and the Forward Bulkhead as a permanant componet of the Kayak? I do not see this anywhere on my plans but it included with my blueprint.
Also, any tips to installing the deck to the hull. I am a little concerned about the stability of gluing this to the hull. Did you run any support members to increase the glue up surface.
Very much appreciated Howard!
Stay safe.
Cloyd
RE: Night Heron Hybrid
Hi Cloyd,
sorry about the code red. i have been working out of my house since february and schools here have been virtual for many months now. so be safe. the pictures of the night heron i have been showing you was a project i did with my college-aged nephew earlier this year when his school went virtual and his mother wanted him to do something useful when he was not studying.
but onto your questions (and you can ask as many as you would like....that's why we are here).
on bulkheads....
the boat has bulkheads and they are permanent fixtures. however, they were not finally shaped or installed until after the hull and deck were joined. this was with the understanding that i was going to have fore and aft hatches becuase it would be challenging to install bulkheads if you only had access to one side.
sea kayaks like this, for safety reasons, should really have the cockpit isolated from the forward and aft section. it keeps the boat high in the water if you accidently tip over making it relatively easy (with some practice) to reenter the cockpit and get going again. there are a couple options to do bulkheads - you can do with the 4mm okoume (glass on both sides) and epoxy them in or you can use 3 inch thick mini cell foam attached with silicone glue. (https://www.clcboats.com/modules/catalog/product.php?category_qn=boat-building-supplies-epoxy-fiberglass-plywood&subcat_qn=kayak-seats-foam&code=minicell-closed-cell-foam).
the reason i say to install the bulkeads after the hull and deck are joined is you don't know the shape you need until the hull and deck are together and the final location of the bulkhead is determined. bulkheads in this type of construction do not need to be placed exactly where the plans call for and i typically adjust their location several inches from the plans to accomodate my preferences of how i like a boat set up (for example, i like to have some room behind the seat for some things so i often move my rear bulkhead back an inch or two relative to where a plan may show it to create some extra space). also, it is just very hard to know what the shape is that will fit properly until the deck and hull are joined. there is often a bit of 'drift' in the shape relative to the plans and or the location of the bulkhead rarely line up with an existing form in the plans...so you don't know how to size it from the plans.
on glueing the deck to the hull....
this was a bit of work but it all worked out just fine. no additional members/glue surface was needed. the initial work (prior to taping) is edge joining the deck to the hull with thickened epoxy....and then taping over it on the inside and glassing over it on the outside. it is terribly strong. the challenge is getting it all lined up. a generous amount of fibre-reinforced packing tape will be your best friend to get it all together and hold it in shape while you glue it. the picture below shows how we held it together while we glued and taped the inside. after it set, all the tape came off and then we glassed the deck overlapping it onto the hull. very very strong....so no worries.
the deck to the hull is a bit of a complicated operation but there are a lot of viedeos of the strip builts showing how it is done.
hope that helps
h
RE: Night Heron Hybrid
Tremendous advice Howard!
I do have two additional questions:
Does the cedar decking flush mount to the top edge of the hull, or is the intention to flush it to the interior side of the hull when striping it? [I am inclined to think on top of, from an aethetic perspective].
Also, is the combing sill cut out of 1/4" material to align with the thickness of the cedar planking, or can it be the 4mm and simply glue it so that it is flush with the top deck striping.
Again so very much appreciative of your expertise.
Thank you,
Cloyd
RE: Night Heron Hybrid
the cedar will be flush to the top edge of the hull.
however, depending where on the hull you are, there is certainly some beveling of the cedar that is required to make a tight joint with the top of the okoume hull (the shear line) as there is a rather sharp turn/angle from the side of the boat to the deck towards the ends of the boat.
the cockpit sill in the kit is made with 4mm okoume...the same material as the hull. optionally, you can also execute the sill with your 1/4 inch cedar strips. when i build from plans i have often taken that that approach. i just lay the strips over the sill pattern and glue it up cut it to shape.
its a bit tricky when the sill is 4mm okoume as that is thinner than 1/4 inch strips. so if you use the 4mm okoume for the sill you need to carefully pay attention to lining up the outside surface with the same level of the strip...so that the height difference will be on the inner surface where it won't be seen and you can apply a little fillet to smooth the height differences.
h
RE: Night Heron Hybrid
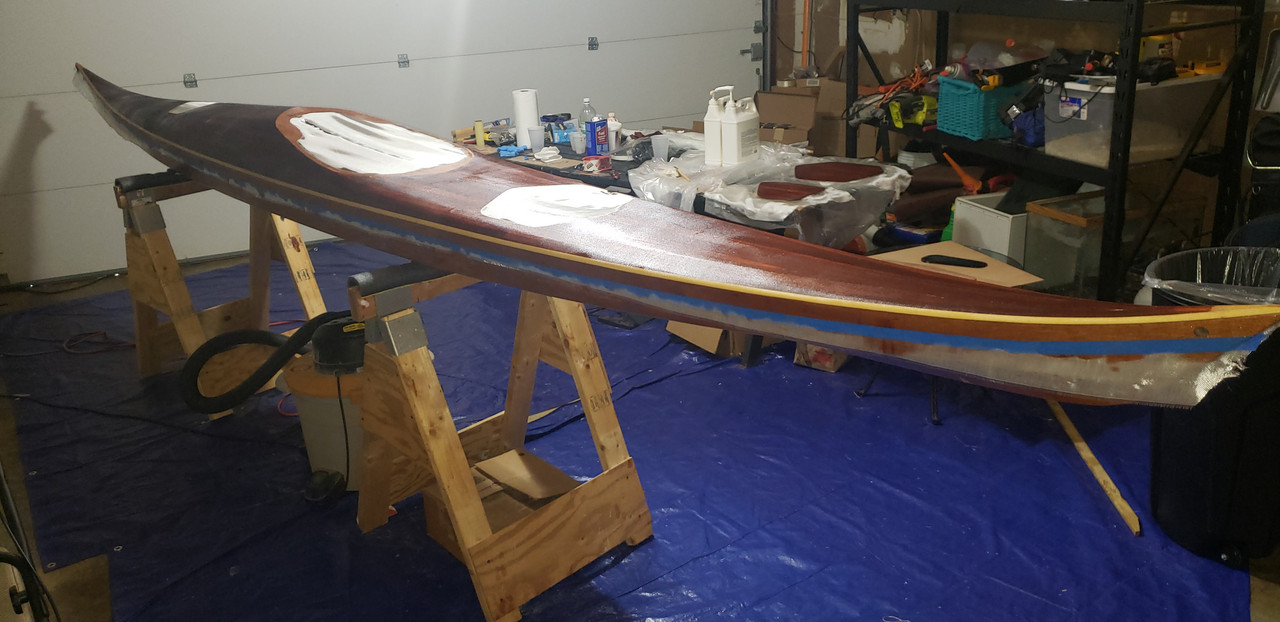
Hi Howard, Hope all is well. Just curious, is fibreglassing the deck done seperated from the hull? Or is this something you do directly on top of it on top of the hull? Many thanks, Cloyd
RE: Night Heron Hybrid
Hi Cloyd,
i glassed the inside of the deck only as well as doing all my internal work and then attached the deck to the hull.
i then glassed the deck and down about an inch onto the hull so I was able to avoid having to ‘tape’ the deck to the hull on the outside.
then i did the hatchwork and the coaming....and finished the boats.
There are some variations in construction order you can make and some folks glass both sides of the deck before joining it to the hull, but I did not do it this way. The main reason I didn’t is that you will get some drift in shape of any strip built deck or hull. they will typically flatten out once off the forms (e.g, they will spring away from the forms/become less curved). At the same time, on a stitch and glue hull….you won’t get much drift (e.g., it will hold its shape) which basically means you are going to have to put a bit of muscle into it to get the deck to line up with the hull when you actually go to put these pieces together. If I had glassed the outside of the deck before joining the two halves, it would be a lot harder to bend the deck into the proper shape to get it to mate with the hull. The second reason to approach it this way, as metnioned before, was to avoid the need to tape the outside as I was able to simply overlap the deck glass onto the hull and fare it in.
Anyway, I hope that answers your question and that you are doing well with your build and wishing you a happy new year!. Am attaching a picture from about a month ago when we took the night heron out on the water here on the Potomac.

h
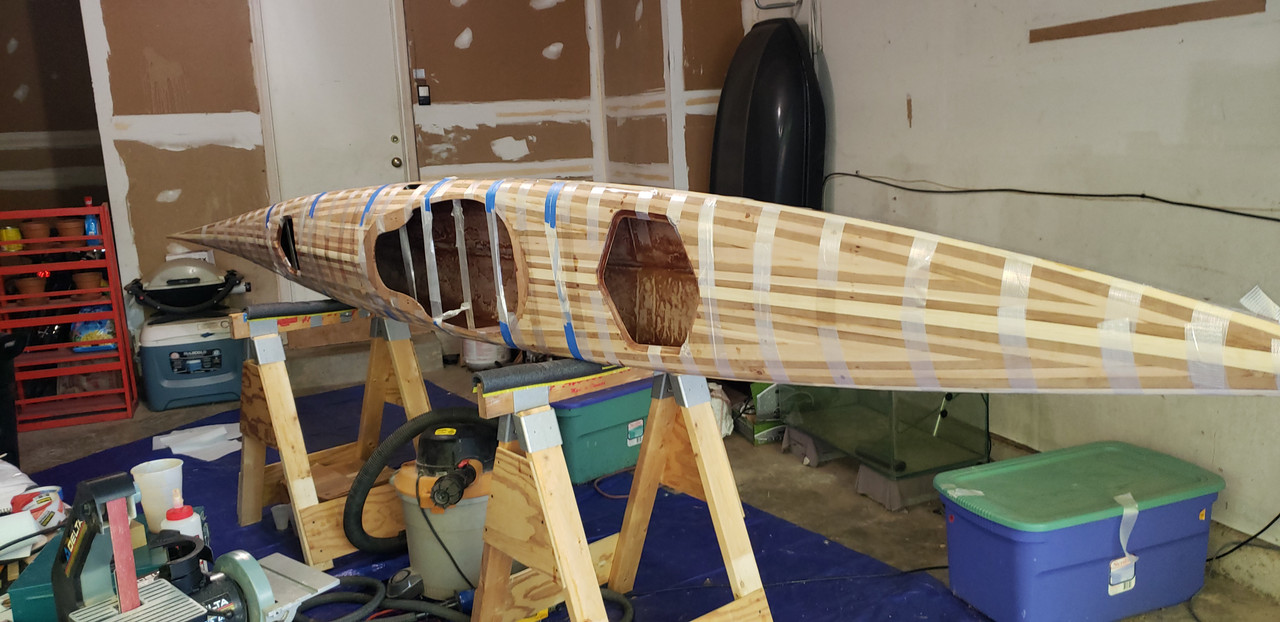
RE: Night Heron Hybrid
Cloyd,
i was looking a some of my build pictures and saw that i did do some of the hatch work (cut them and did the underside work - spacer/shelf) prior to attaching the deck to the hull.
so below picture is now glassing the deck and overlapping it onto the hull (you can see the deck hatches being glassed at the same time in the background).
as i recall it now, i have, based on experience, determined that i liked having access to the underside of the deck to do real clean underside hatch work...that is just really tough to do once the hull and deck are mated.
the picture below shows doing the spacer and shelves - but though this picture shows the deck on the hull, they had not been glued together yet.
the thing that i was trying hard to manage was the spring-back phenomenon i described earlier. so while in the picture above, the hull and deck are not glued together, i did temporarily tape them so that when i glued the spacer and hatch to the hull, i would have them glued with the hull in the correct shape and not accidently 'lock-in' the springback that occurred (if it wasn't temporarily held in its final shape. after this picture, i then seperated the parts again and nicely finished the underside of the hatches....before the 'permanent' glueing of the hull to the deck.
i hope that makes sense. obviiously, another approach is to cut and do the hatch work after the deck is attached.....but like i said...its just hard to get a really good result for the below the hatches bits working blind....especially if the hatches are not particularly large.
h


RE: Night Heron Hybrid
» Submitted by hspira - Mon, 11/16/20 » 11:36 AM
i recently completed one.
happy to help. just let me know what your questions are.
below is picture
h