
Builders' Forum |
|
| ↓ Scroll to Last Comment ↓ | Forum Guidelines | Builders' Forum | |
So now that we've had some snow, I decided it's time to get this much-anticipated milestone behind me. Began to assemble the Waterlust kit I received back in Feb. '17 yesterday evening.
50°F's my aimpoint for keeping garage space compatible while I wait for epoxy to cure in there so MAS Fast hardener was my choice for assembling puzzle-jointed planks. After 12 hours, taking the cauls off revealed nicely flat joints. Will post progress pics as further stages are completed.
My thanks to everyone here and at CLC for your comments on various aspects of stitch'n'glue assembly (this is my first!) and other related (some maybe not so much) topics discussed here since I signed on several years ago!
17 replies:
RE: Waterlust Project Begun
...or at least a boat-shaped object to sand...longly...er...um...longingly....<;-)
.....Michael
RE: Waterlust Project Begun
In six days I've got all hull panel joints glued up, all but the bottom's scraped smooth. May commence stitching later today, begin asembly of other sub-structures.
Discovered that a chainsaw sharpening file works great to take fuzzy edges off puzzle-jointed pieces. Didn't bother with hull panels being that they're narrow enough to slip together the curvy bits once the epoxy's been applied. Dry-fitting the bottom panel joint though proved the value of taking the substantial 'flash' off; there was much more of that on those two pieces than on any of the hull's panels.
RE: Waterlust Project Begun
Nine days after starting kit assembly I'm impressed with how easily these CNC'd kit parts go together! Even with the cooler-than-typical temperatures I'm working under I've got all the hull panel puzzle joints glued and scraped flat and one sheer clamp glued to its panel. The second will be attended to once I post this message.
Working to affix that sheer clamp yesterday evening I had an exciting moment with the epoxy applied, the clamp strip placed and maybe 3/4's of the spring clamps holding it in position when the whole thing began to topple off my bench.... I'd failed to appreciate the need to overcome the tipping moment created by so many clamps all on one side of the panel being worked with!
All's well that ends well; I managed to get things secured and the rest of the clamps in place for an overnight's cure @ 50°F. Nothing shifted.
The next clamp will be secured with its panel held nicely against the bench with the set-up I thought of while scrabbling to get that first one back onto the bench before the epoxy began to click. A little planning can go a long way towrds a successful outcome!
RE: Waterlust Project Begun
Day 10 passed yesterday with me beginning to stitch the two #1 panels to the bottom piece.
Next pic shows a bit more of the bench I constructed with this project in mind, as well as serving as a work surface for various other home-improvement projects I've undertaken since my kit arrived. There's ample storage underneath for lumber & other supplies, all of which serves nicely as 'ballast' to keep the whole thing from shifting.
Topped by 1/2" melamine-surfaced particleboard it's flat, level and practically no adhesives will stick to the melamine so it's easy to keep free of build-up. And I can run screws into it whenever and wherever I feel a need when making up temporary clamps to secure things.
Those melamine panels can be easily removed when necessary; they're positioned by small scrap cleats glued underneath (with an appropriate melamine adhesive) to the edges as doublers and in places where they butt up against the bench frame's cross-pieces.
I had the same reservations as MartinC over storing completed panels once glued up. Hit on the idea of adding small turn-cleats on the table legs on which the assembled panels could be placed, leaving the top surface free for other operations. In that linked pic you can see some of them stored safely until they're needed.
RE: Waterlust Project Begun
11/16/19 marked Day 13 of my Waterlust build. With another weekend day ahead of me today (after shutting things down last night this far along) I ought to be at the 'check for squareness' stage before beginning to tack panels together tomorrow.
The speed with which this watercraft project is shaping up leaves me in awe of the thought behind the level of skills the folks at CLC have brought to our table.
Everything fits! Tolerances of 1/32" or less - as long as I'm careful in the operations necessary to bring things together!
When I worked for a design firm a few years back the cabinetry shop bought into CNC technology for fabricating components, vastly expanding the complexity of displays they could provide to clients. With this Waterlust kit I appreciate even more how much effort (and time, money, thought, planning) has gone towards both expanding the range of watercraft designs we can choose from as well as simplifying the process of building them compared to what we used to have to endure.
RE: Waterlust Project Begun
So I’m two weeks into assembling my Waterlust kit yesterday. Weekend’s progress was fantastic! It looks like a canoe now yet in a pretty rough state….
I had one problem stitching stern seam together after tapering up shear clamps. Both panel #4’s aft puzzle joints may have been a bit lacking in thickened epoxy when I glued them up last week ‘cause they look to have ‘popped’ a bit and the port shear clamp’s slightly cracked. This all happened right where those aft puzzle joints are being forced to bear the strain of being bent over the edge of frame #7.
Trusting epoxy to hold everything together once I get to filleting the panels to the frames I’m pretty confident this isn’t going to be a major issue. In the mean time I have scabs clamped against panel edges while I fit the breasthooks.
In trial-fitting breasthooks I came away wondering why their shapes didn’t better match the shapes those shear clamps had taken on once I’d tapered their ends before bringing panel ends together with wire stitches. Manual says breasthooks need to be bevelled according to the diagrams in the manual, but there’d have been a lot more material removed to make them fit had I not called Dillon yesterday for an explanation.
Turns out those breasthooks are critical for bringing both bow & stern into their final shape! When fitting the breasthooks it’s necessary to force the panels apart between the closest frame and where the breasthooks will eventually be glued into place. So just tapering their outside faces is all that’s necessary to get them to fit up nicely.
Had I known that when I tapered the shear clamps I suspect the aft puzzle joints on panels #4 wouldn’t have been stressed enough to begin separating. Oh well….
Here’s a pic of both breasthooks dry-fitted in their respective positions, held in place with all sorts of clamps needed to hold everything securely and bringing everything into their proper shapes. (That admonition about boat builders never having enough clamps is spot on!) Note the ‘reversed’ clamps used to spread the panel edges placed near the closest frame, and how they need to bear against temporary blocking clamped in place to keep the clamps from slipping on the angled panel surfaces.
Later this morning I’ll be mixing epoxy to begin tacking the panels to the frames at the bow & stern, as well as panel joints in those locations.
RE: Waterlust Project Begun
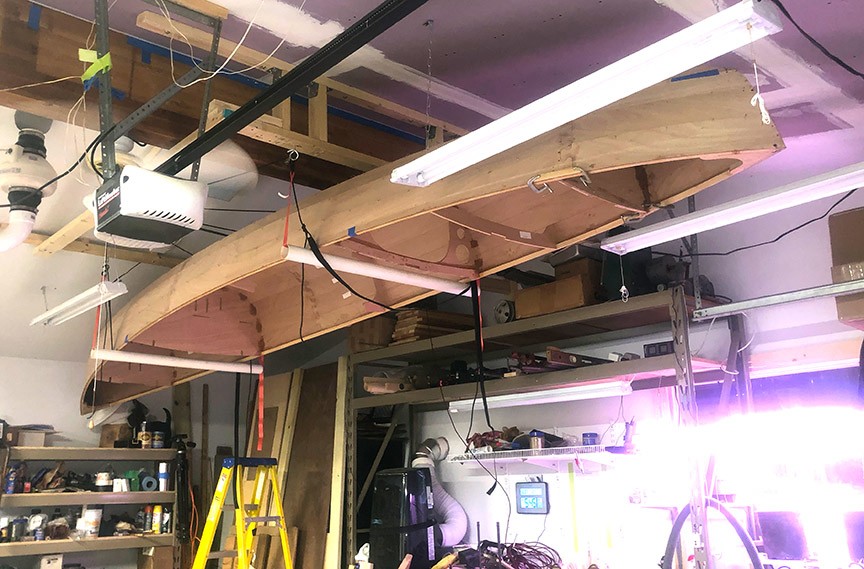
Passed a milestone today... got HarkenHoister set up & tweaked to bring my Waterlust project up into its "winter quarters" for a test.
Critical that garage door can be opened all the way! Wife keeps her MINI in her half of our garage while I use the floor in my half for all kinds of endeavors. Also will be wanting to park my Clubman in that space as winter thickens here.
[URL=https://imageshack.com/i/plKdyj1Nj][IMG]https://imagizer.imageshack.com/v2/xq90/921/Kdyj1N.jpg[/IMG][/URL]
(Trying new image hosting service too so hope this works!!)
Dillon's assembly manual drawing scaled up perfectly in my planning drawings for the space. What I saw on paper when I started laying out the HarkenHoister positioning worked out to within +/- 1" in reality!
Limited space dictated adding ratched straps to the Hoister rigging, both to take up the last 12" as well as a measure of additional security. With me either working underneath from time to time or parking my Clubman under it, somehow that'll help me sleep better at night!
RE: Waterlust Project Begun
Hit on an idea when making up rudder cassett a couple of nights ago. Take a length of vinyl tubing of an appropriate OD, use it to form up an epoxy 'liner' for the rudder's uphaul line eventually to be run thru the rudder cassett spacer shown here.
Took precautions to paste-wax the section that'd act as the form shown here before embedding in thickened epoxy when I made up the two-piece lamination. Once everything'd cured up it was relatively simple to pull the tubing free, leaving a nice smooth curved bore for the uphaul line to run through later. A bit of clean up with a half-round file (& one of those hacksaw blade Ninja rasps I've had for 40 years!) and it's ready to add the cassette cheeks next!
RE: Waterlust Project Begun
Deserves a German sounding name, it does: der überlegene Schlauchlochformer!
Farfegnugen!
.....Michael
RE: Waterlust Project Begun
So today marks the beginning of my sixth months of progress getting my Waterlust canoe assembled then launched.
Others seeking info about mine and other builders' progress I suggest use of the search function here. There's more than one thread now about this product and the work being done to get them out onto the water.
In addition there's a thorough thread on the forum hosted by the UK distributor for CLC kits where (bowing to the fiddly nature of posting images here) I've been adding images showing my project's status.
Rather than taking up space here with cross-posts I'll just add a link now & then as the FyneBoats forum thread gets added to.
RE: Waterlust Project Begun
Another milestone passed yesterday with the successful bonding of my assembled & glassed deck piece to the completed hull. Took 3-1/2 hours but done single-handed I'm quite pleased with how it's looking after over eight months' work!
There's a LONG thread with three other Waterlust builders on a forum in the UK with ample pictures from the bunch of us showing how each project is working out. I guess I'm the slow poke; the others started well after I did and are already afloat!!


RE: Waterlust Project Begun
» Submitted by slick95 - Tue, 11/5/19 » 2:00 PM
Congratulations, keep momentum even if a small amount and soon you'll have a canoe to sail!
Fun project,
Jeff