
Builders' Forum |
|
| ↓ Scroll to Last Comment ↓ | Forum Guidelines | Builders' Forum | |
Hi, I'm just getting started on my build from plans of the Tenderly, and wanted to get some accounts from others that haven't built from the kit.
I've transferred and roughly cut out the frames and planks, and looking ahead to trimming the pieces down to the pencil lines. I work almost exclusively with handtools, though I do use a jigsaw and/or bandsaw for some cutting.
My question is how to trim down to that final dimension - there are a lot of sharp inside corners that are going to limit the use of a plane, spokeshave, etc. Paring with a chisel by hand will be tedious. If the frames didn't have those little tabs to fit into the hull planks, it would be much easier.
Or, do I just conceed that most of these inside surfaces are going to be covered by fillets anyway and live with "second class" saw cuts?
Any other crucial tips in building from plans (especially with handtools) would be greatly appreciated.
9 replies:
RE: Tenderly Build from Plans
���Thanks Dick,I didn't think of using a rasp, I don't do much shaping in my other work to warrant one. Time for a trip to Lee Valley!
RE: Tenderly Build from Plans
#60 sandpaper glued to dowels and square pieces of wood makes short work of inside curves and corners on a soft wood like okoume.
The tabs and slots are not strictly necessary and can be replaced with wire stitches if you don't want to fool around with cutting them.
I've built a boat where I hardly cleaned off the splintered edges left by a coarse saw and it was as you said - they were covered by the fillets and looked perfect.
Have fun,
Laszlo
RE: Tenderly Build from Plans
I may be a little late to the party, but I've built two boats from plans. I know that ship may have already sailed, but I use a japanese pull saw to cut right on the pencil line ($11 from Harbor Freight). I can reach precision well under 1/16", probably around 1/32". Being able to cut on the pull stroke with a long flexible blade really allows you to follow the gentle curves of the planks. You may still be able to do that if the waste from the jig saw cut is thick enough for the saw to track.
My second piece of free advice (you get what you pay for) is the Shinto rasp is your best friend. On one side, you can hog out lot of wood to get close to the line, then flip it over and you can sweeten up that edge right up to the line.
Other than a router and sander, that's about the only tools you'll need for the whole build.
Am I to understand that plans now come with the tabs & slots built in so the parts click together to automatically align themselves? That's very interesting. On both my plans builds (Eastport & Passagemaker), there's been a little wiggle room in that area, always leaving a little question in the builder's mind about exactly where some of these things are located. Hmmm...
RE: Tenderly Build from Plans
Hi Skully,
Thanks for the tips, I ordered a rasp last night so we'll see how that goes. I very rarely work with plywood so I'm unfamiliar with how it's best worked.
There are small tabs on the frames and locations for mortices in the planking, yes. I'm a bit confused by them, though, as the mortises are a lot bigger than the tabs - the mortises are about 1/2" wide for the plywood frame that's only 1/4" (6 mm) thick. I'm guessing they have a minimum 1/2" width for their CNC cuts and that carried over to the plans, but that seems like more wiggle room than would be helpful.
The frames do have obvious flat surfaces to fit the planking, though, so I'm thinking I'll just cut the tabs off and that will let me use a hand plane to work down those surfaces.
RE: Tenderly Build from Plans
Danno,
To second Lazlo's suggestion, rough edges that are covered by fillets probably make a stronger bond than smooth ones. I would suggest that you not be too quick to remove tabs that are there to make alignment easier.
Cheers,
Dick
RE: Tenderly Build from Plans
I'll have to think about the tabs - there are already holes for copper wire for alignment, and even if I had to use a staple gun through the planking to keep things aligned, that still less intrusive than a 1/2" wide through mortise that needs to be plugged. As Skully noted, the tabs aren't there on other similar dinghies, so it surely isn't too critical.
RE: Tenderly Build from Plans
A while back, there was some discussion about the tabs on a kit. They caused some confusion about temporarily installing the bulkheads in order to get the proper hull shape, but being able to remove them later after glassing the bottom/exterior.
If just left in place with no other considerations, the bulkheads' tabs might accidentally be permanently glued in place while glassing the bottom/exterior, thereby making it much more difficult to glass the interior. It would have to be done in sections instead of one large layup with the bulkheads removed, once the hull is stiff enough to retain its shape after the bottom/exterior cures.
I hope that made sense...
RE: Tenderly Build from Plans
Makes sense, though on the Tenderly, the tabs are on the interior frames which are permanent.
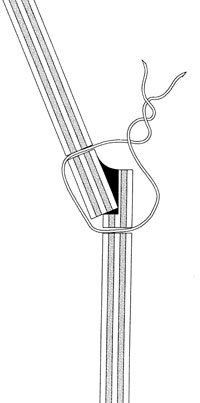
After considering the tabs again last night, I'll likely give the rasp a go and see if I can live with them in place. The frames also have protrusions at the corners where the lapped planks meet (see image below) so I would also have to knock those off to get nice plane surfaces to smooth.
https://www.clcboats.com/images/photos/shoptips/lapstitch/Lapstrake-Photo-2007.jpg


RE: Tenderly Build from Plans
» Submitted by Dick Dowdell - Tue, 9/25/18 » 6:25 PM
Danno,
I've not built a Tenderly from plans, or at all, but I have cut parts from sheets of plywood. I've always cut proud of the pencil line with a jigsaw and then taken the edges down to the line using:
The sandpaper grit and the coarseness of the rasps must be matched to the amount of wood to be removed. Coarse removes wood faster but leaves a rougher surface, finer is slower but leaves a smoother surface.
You probably know this already and hopefully a real Tenderly plans builder will respond.
Cheers,
Dick