
Builders' Forum |
|
| ↓ Scroll to Last Comment ↓ | Forum Guidelines | Builders' Forum | |
Hi Everyone,
I'm about to start a kaholo 12-6 from plans. I've only built kits in the past so I'll have lots of questions to be sure.
Cutting the scarf for the plywood is my biggest concern. I have a couple specific questions that I haven't found an answer to (yet) in the forum or the shop tips.
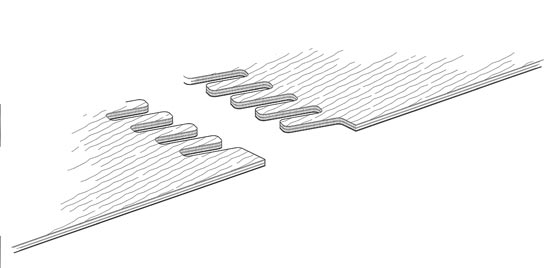
1) the scarf for 3mm ply is one inch. The manual shows the pieces stacked in a stair step fashion in order to cut multiple sheets at once. Is the stepback in this stair step approach the one inch or is is something more or less? I hope that made sense.
2) When stacking the sheets to cut the scarf am I correct in assuming they should alternate "good side" up then "bad side" up in order to have the sheets glue together with the entire length then being a "good" side for the exterior of the board and the other being the "bad side" for the interior of the board. I did a mock up using post-it notes and this seemed to work but I want to make sure before committing to the real thing.
I'll expirament with some scrap and be using a sharp blade. Any help with these questions is greatly appreciated!
Patrick-17lt, duckling, kaholo 12-6
18 replies:
RE: scarf joint
Catalina Charlie,
Thank you very much for your response. It's really informative. The tips you gave I would never have known about. I especially like the idea of using a sander. Good to know I have that option.
I'm hoping to get some pieces cut out this weekend. Now if I can just find some 3mm okoume in Colorado...
Patrick
RE: scarf joint
I'm wondering if anyone has used a butt joint instead of a scarf joint for the Kaholo. I've built 10 S & G boats and have always used butt joints. I'm much more comfortable doing that.
Any thoughts out there on the feasability of using this method? I usually use 6 oz. biaxial tape with a 4 oz/ directional FG finish veil on the exposed side(s). Plenty strong I think.
Thanks! Marc B.
RE: scarf joint
Yes, a butt joint with fiberglass tape (AKA Payson joint) should work just fine. In fact, CLC recommends fiberglass tape on the inside of their "finger joint" used in their kits. Or you could use a small piece of 3mm on the inside. I've done that as well, and zero on outside save for the fiberglass sheath cloth layer.
RE: scarf joint
You will be much happier with a scarf joint. Take a little time practicing cutting a scarf. Epoxy glue with filler is very forgiving when gluing scarfs.
RE: scarf joint
Charlie C ... great piece of advice on the sacrificial piece of plywood on top. I will use it on my Mill Creek build.
RE: scarf joint
I just watned to echo some of the advice above. I have ruined, or come colse to ruining joints when not using an extra piece of plywood on the top. I also use a sander primarily when making the joints. The handblock plane caused a lot more cursing and frustration for me than actual progress. I realize this is likely my own failing, but I just had/have trouble with making scarfs using the block plane.
The time you save in stacking cannot be overstated either.
Just don't make two left sides of your Kaoholo like I did. Its really depressing when you start to wire up your board and realize you need to go back multiple steps.
RE: scarf joint
My addition to the scarf-a-cascaded-stack tips above: Adding double-sided tape between sheets near the edges to be scarfed helps to combat their tendency to bow up in the middle (and improves scarf consistency and edge/tip shape).
Details:
If apologies are in order for reviving a 10 year-old thread, I apologize, but I found these tips useful when scarfing sheets for my Kaholo 14 and have one to add.
One thing that I didn't see addressed above is how to deal with sheets that don't lie flat - typically bowing up in the middle of the edge/scarf in my experience. I kept getting jagged (or even sanded-off/planed-off) edges/tips in those bowed-up areas of long scarfs for obvious reasons. I tried clamping in a few different ways but found that (1) this impeded sanding/planing range of motion at the top of the stack (obviously) and (2) the bowing was only muted, not eliminated (particularly on lower sheets in a multi-sheet stack since far from the clamp(s)).
The only thing that worked for me was adding two strips of thin/narrow double-sided tape (Scotch brand and similar in appearance to vanilla Scotch tape) beneath/near the edge of each sheet/plank to be scarfed. The tape pulled off bits of veneer, but I minimized damage by (1) keeping the tape a few mm from the edge to avoid destroying the fragile tips and (2) removing the tape perpendicular to the scarfs (i.e., with the grain).
Any other tips to counter sheet/plank bowing effects?
RE: scarf joint
If you're not married to the idea of a bright finish you can use screws (carefully placed to avoid the tools used to cut scarfed surfaces) to pull plywood sheets into closer contact. Obviously this will put holes where there had been solid ply so plan accordingly.
RE: scarf joint
Reviving an old thread for a classic question is OK to me.
I am also thinking of building with plans rather than buying the entire kit and this is a topic I have been mulling while trying to source materials locally.
SCARFS - 1" in 3mm??? Why not create a 1" deep 1/2 joint? In such a small scale I would think a half joint to be every bit as strong as the scarf and pretty easy to set up with a router jig. Mill one joint at a time or have a half lap session with all your pieces. Straight forward to register the joints for a solid glue up.
As a more radical idea - I would pay extra for CLC to make up their finger joint method as available to purchase Router Templates. These could be of 6mm ply or a bit thicker, of each mating pieces (cut square - with room away from the router to clamp). With these a top bearing router bit could be used with a hand held router on the 3mm stock. Plan builders could have finger joints too. Thoughts?
RE: scarf joint
I believe that this is what you're looking for - CLC Puzzle Ply. Size B is available in 4, 6 and 9 mms thicknesses. Just cut the fingers off leaving as much wood attached to it as needed for clamping.
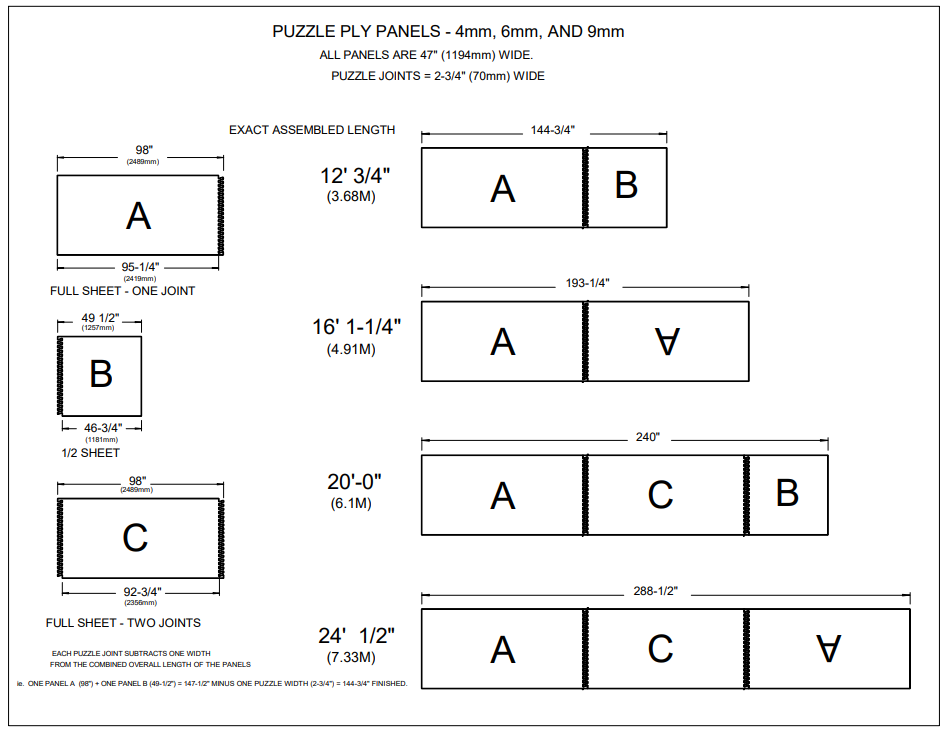
Laszlo
RE: scarf joint
Yes thank you - that is the basic idea but I'm proposing rather than the full panels as posted above - CLC could simply send out the ENDS. Maybe 12" to 20" long X the width of the "planks" of the specific boats. I haven't studied enough or scoured through the abundant and rich recourses of the CLC site but probably a 12" long x 20" to 24" wide "template" would accomodate most needs. No need to glue up full width sheets.
Am I mistaken to think that end gluing up 1 "plank" width & length at a time is more practical than trying to finger joint or scarf full widths sheets of plywood?
Someone building from plans and sourcing their 3mm ply locally could use a pair of these templates as a router jig to create their own finger joints.
RE: scarf joint
If you have access to a small CNC or a company which sells CNC services I would be glad to send you a DXF file for cutting finger joints. With the DXF file in hand you could cut your own templates to subsequently use with a top-bearing router bit.
RE: scarf joint
Thanks djdewitt but I don't have local access to a CNC shop. This misses the point that I am proposing an accessory product that CLC could readily produce. As a professional woodworker I have the ability and shop set up to create such a router jig on my own but it is a time consuming project - with the time being better spent on the fun stuff of actiually building the boat.
Back to the question of the 1" scarf versus the 1" half lap. Especially if these joints will be overlayed inside and out with fiberglass cloth, why would the 1/2 lap not be every bit as strong, easier to produce and cleaner looking as the end product?
In fact such a 1/2 lap could be constructed as a flush butt plate. The two "plank" ends 1/2 lapped 3" in or even 4" from the ends, rather than 1" then on the inside, epoxy in a 1/2 thick filler - could be solid wood with the grain oriented properly - left a bit thick to finish in flush with a light sanding.
Please - I'm not intending to be argumentative - simply considering alternate methods and asking if others have considered or experimented. If and when I decide to buy a plan version rather than the kit I will do up some test samples and discover for myself. Can share with you all then, in the meantime, I ask.
RE: scarf joint
Sorry, I misunderstood and I agree that it is something CLC could easily make and sell. As for making a router jig cut finger joints the fastest way to do it is to 3D print a jig for each half of the joint. Super easy to do
RE: scarf joint
One thing to keep in mind with 1/2 lap vs. scarf is flexibility and force concentration. If you are having the joint be part of an extreme bend (like some of the kayak models have), the scarf is better because it does not have a linear hard edge 90 degrees to the direction of the bend.
The tapered profile of a scarf smoothly distributes the force across the joint. The 90 degree transition edges of a 1/2 lap concentrate the force in the profile corners. At the very least this could result in a flat spot instead of a fair bend for extreme bends. Worst case, the joint could fail.
Laps are best suited for gentle or no-curve applications or applications where the joint runs in the same direction as the curve (think lapstrake planking).
Puzzle joints have a smoothly curving bearing surface along the direction of the bend, so they behave like scarf joints as far as bending goes.
So if you're going to substitute a 1/2 lap for a scarf, consider the direction and amount of curve in the piece.
Laszlo
RE: scarf joint
Your points have merit Lazslo - thank you. I will mock up some samples when I get to building. Test the respective flexibility (before adding fiberglass) just for my own awareness. In these thin dimensions I will be surprised if the lap proves less successful BUT if it does fail it will be enlightening and worth knowing. Will post again here someday with my results.
AS A COMPLETE OFF TOPIC - This CLC forum is the squirreliest text program I have ever dealt with. No spell check and placing the cursor for the next paragraph is a ”what the heck“ challenge, lol. Is it just me with my Mac book/Safari operating sytem and browser or are we all in the same boat?
RE: scarf joint
djdewitt if you could send me your DXF file for cutting finger joints, I'd very much appreciate it. I'm building the CLC teardrop from plans, and would prefer to cut out the pieces pre-joined, rather then joining later. A friend has a large CNC and is happy to cut out a template for me.
email cossackpw at gmail dot com.
Thanks.


RE: scarf joint
» Submitted by Charlie C. - Thu, 9/13/12 » 10:53 PM
Pat
You are correct, for a 1 inch scarf stair step the pieces one inch. You are also correct about the good and bad side stacking proceedure. Here are a few tip I'v developed over the years scarfing plywood.
1. Stair step the scarfs the length of the scarf.
2. Alternate the sides of the plywood so that you end up with two good sides up.
3. Place a dummy/waste piece of plywood on top of the top piece of plywood because when you sand or plane the top piece of plywood you have a tendency to round over the top edge.
4. Place a firm piece of wood or a flat steel plate or the sharp edge of you table saw under the bottom piece of plywood in the stack. The bottom piece of plywood will be cut to a feather edge and you want it well supported in the cutting process. This piece of material is even with the edge of the bottom piece of plywood. You will now beable to run the heel of you sander or plane below this firm edge.
5. When cutting the scarf use the laminates as a guide. That is the glue joints of the laminates will be straight edges when the scarf is correctly cut.
6. For 3/4 inch plywood I use a power plane but this is not necessary for 3 mm material. For my Kaholo I used 60 grit on a 5 inch disk sander. You can also use a hand block plane that is razor sharp and finish up with sand paper on a block.
When glueing scafts I do the following:
1. I tape off the edges of the scarfed joint the full width of the scarf. Where ever you don't want glue put down tape. It is a heck of a lot easier to pull off tape than sand off glue Also, tape is cheaper than sand paper. During the entire build I always taped off the boundries of the glued joints
2. After I have taped off the scarfed joint about 4 inch back from the joint I put down waxed paper, spread thicked epoxy, and place the piece of plywood to be glued. The tape on the edges of the scarf will assist in placing the pieces. Now you can place a piece of tape the full width of the scarf right on top of the area that the glue is being squished out of. Then put down a second piece of waxed paper. On top of this place a 1 x 4 strip of wood and weights.
Note, when scarfing the two bottom pieces to the aft bottom piece be sure to overlap the bow sections in the area of the tip of the bow and frame 2. This detail may not be obvious but you will see it if you extend the center line with a straight edge to the bow.
When cutting out the 3 mm ply I used a sabersaw with a metal cutting blade. I cut next to the pencil line and then block planed to the edge.