
 return to section:
 Day 6, Peeler Skiff build for CLC.
Today I removed all of the wires, filleted all of the joints, and applied fiberglass tape over the filleted joints. First off, I went around and snipped all of the wires from the inside. I always stitch with the twists to the outside, and snipping the insides makes it fairly easy to pull the wires out. Most boats have more strakes, and therefore more wires. Snip them systematically to avoid missing any. I usually give a little twist when I snip, so that I can see that the wire has been cut. If you have done a good job of keeping epoxy off of your wire stitches, they will come out with little fuss. If you have gotten epoxy on your wires, however, you can still remove the wire with little trouble by heating up the wire with a lighter or a small butane torch. The heat liquifies the epoxy, temporarily, and the wire can be removed without damage. If a wire breaks off and cannot be removed, it is okay to leave it. It will be encapsulated in an epoxy envelope, and will cause no problems down the line. I save the removed wire for recycling.
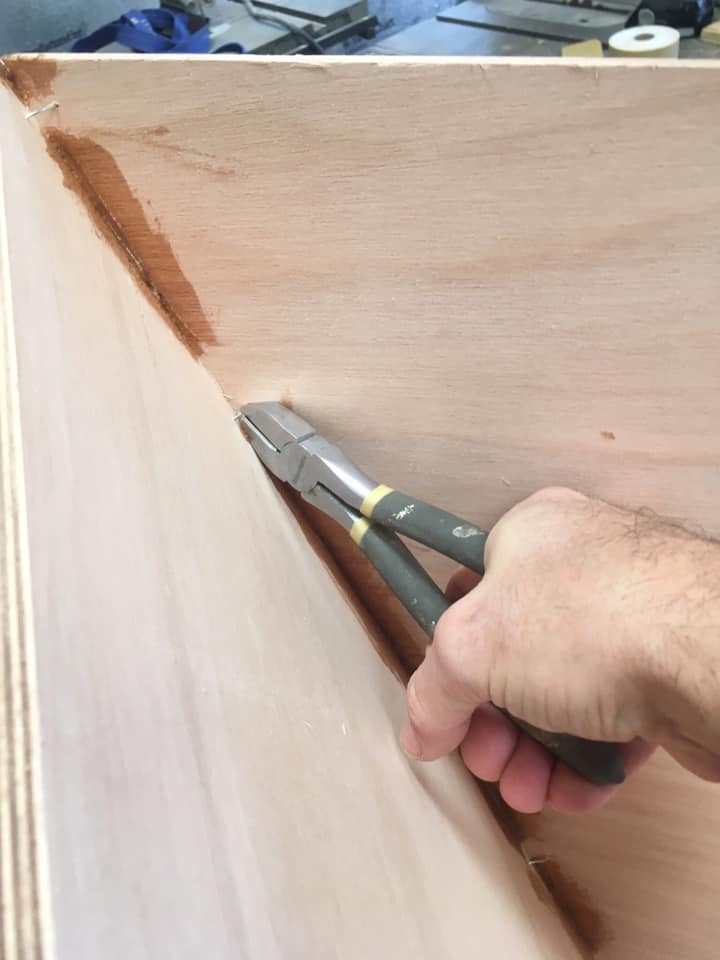
Snipping wires from the inside makes them easy to pull out from the outside.
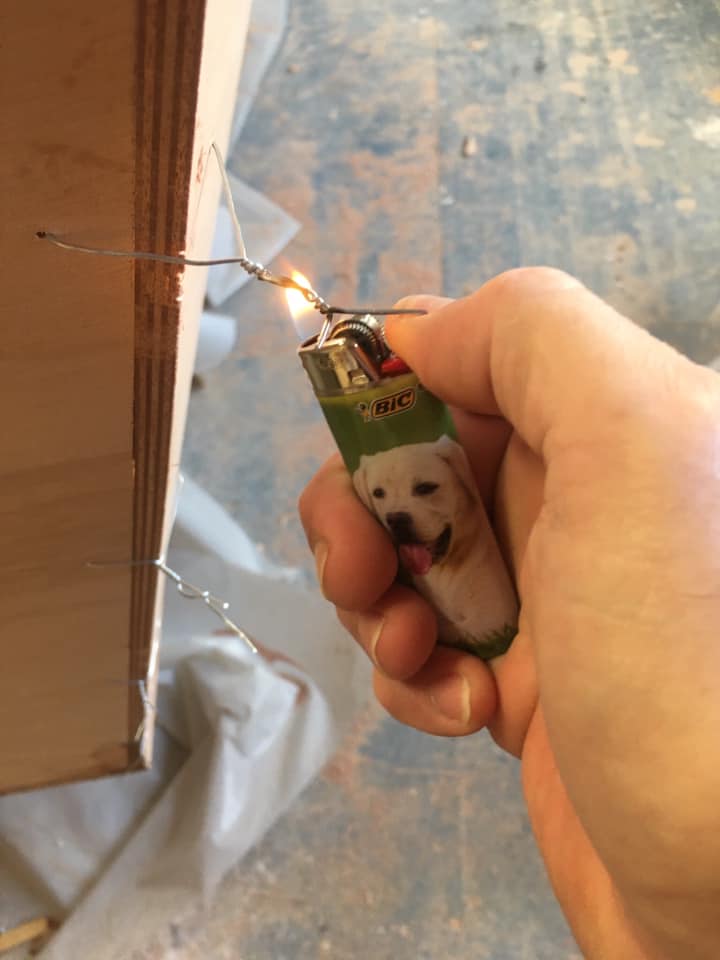
If a wire doesn’t come out due to there being epoxy on it, heating the wire will liquify the epoxy and the wire will come out without any problems.
Next, I found the fillet tool I wanted to use for this job. The book said to use a 1” wide tool, which I consider to be the standard size. But when I held it to the joint at the transom, it was smaller than the joint that needed filleting, so I used a 1 1/2” tool for all of the joints except the bow and bulkheads for which I used the standard 1” size. CLC sells pre-made fillet tools which are made from plywood scrap that would otherwise go to the dumpster. They are very handy and can be used many times over if kept clean.
After choosing the right size fillet tool, I run the tool over all of the joints, dry, to see if it catches on any dried epoxy clumps. It will feel like hitting a little speed bump. Then I quickly sand the little clump flat (chisel for bigger clumps works well) and then pass my tool over again to make sure it passes smoothly. If left, the little clumps would create an unsightly hump in the fillet that would require difficult sanding to make pretty. If applying fiberglass tape over the fillet, a hump would create an air bubble in the glass, and strength would suffer.

Give the fillet tool a dry pass over all of the joints to find any clumps that need to be sanded away.
Next, I “primed” the seams by painting unthickened epoxy over all of the joints. This is a step that is often skipped, but in this case I wanted to make sure the deep joints, especially at the transom, were completely filled and all of the surfaces inside the joint were coated. Deep joints, like bow stems and transoms, are especially difficult to get completely filled with epoxy fillet. Priming with unthickened epoxy not only coats the surfaces within the joint, creating a stronger bond penetrating deeply into the fibers of the wood, it also makes a slick surface inside the joint that makes it more likely that the thickened epoxy will push completely in and fill the joint totally.
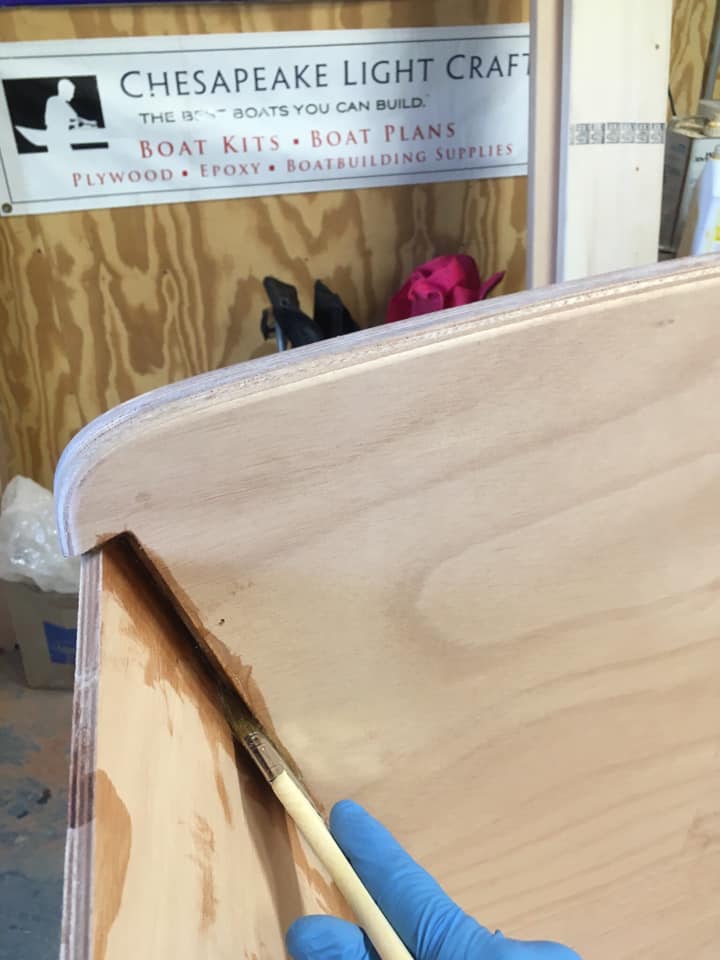
“Priming” the joints with epoxy that has not been thickened, coats all of the surfaces of the interior of the joint and and soaks more deeply into the wood than thickened epoxy, creating a stronger bond. It also lubricates the surfaces, making it easier to get the thickened epoxy all the way into the joint, making it less likely that there will be any voids.
Next I mixed a big batch of epoxy thickened with wood flour. When mixing large batches like this, I take the pumps out of the epoxy jugs and mix in a measured mixing cup at the 2:1 ratio. I have found that 12 oz total is a good amount to thicken with wood flour. Any more becomes difficult to thicken up evenly and the extra mixing time it requires puts me in danger of losing the batch to premature hardening. So to make a 12 oz batch, I pour in 8oz of resin and 4oz of hardener. Be extremely careful not to mix up which is which. Blue is resin, red is hardener. Also, put the pumps into two individual cups so that they don’t make a mess as they drain. And, be careful to replace them into the correct jug when putting them back. Mixing them up would likely ruin the whole jug.
Once the epoxy was mixed to a thick peanut butter consistency, it was time to begin filleting. I started at the big joints at the transom. This required a lot of epoxy. I started by pushing it in deeply with the tool, smashing it in until it was pushing back out. Then I applied the fillet material, messily, getting plenty of material onto the surface of the joint. Finally, With firm pressure and a consistent angle, I drag the tool from one end of the joint to the other. The result should be a smooth clean fillet with a clean line on both sides with a lot of messy fillet material just beyond the clean area. The messy part is then scooped up with a plastic spreader or putty knife and replaced into to epoxy cup to be used on the next joint. Care must be taken to clean up all of the unwanted epoxy mess without accidentally touching the finished fillet. If the fillet is hit, it will need to be redone with the fillet tool.
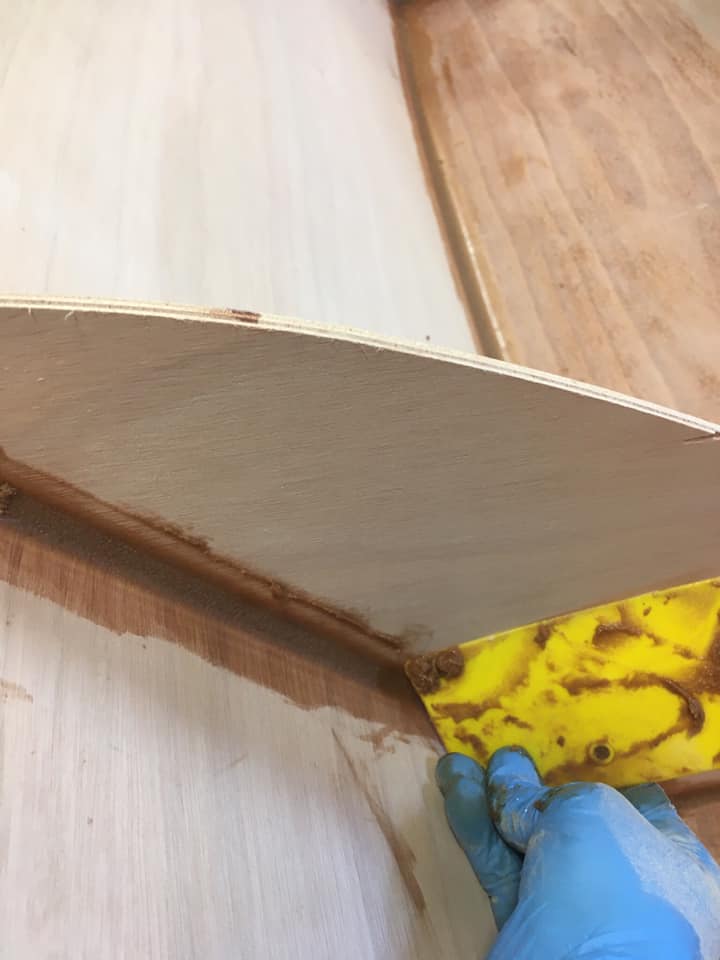
Cleaning up the fillets requires patience and a steady hand. Take your time. It is easy now, but will be very difficult to sand away when it is hard.
This build requires every single fillet I applied to be reinforced with fiberglass tape. This is done on uncured fillets, which is better than waiting for the fillets to harden because fillets tend to be rough and need to be sanded before applying the tape. Also, it creates a stronger bond between the fillet and the glass, which results in a stronger joint. It is also easy to mess up your nice fillets in the process of laying out the fiberglass tape, so care must be taken.
I cut lengths of fiberglass tape to cover every fillet, pressing them lightly onto the fillets to hold them into place, then I mixed up a large batch (12oz) of unthickened epoxy. I wet the tape out with a disposable chip brush. This is 9oz cloth which takes a bit more time to soak through, so I put a liberal amount on a lot of the tape and then I come back once it has soaked through and smooth it out. I smooth it out with my gloved fingers. This is the best way I have found to press the bubbles out without messing up the soft fillet underneath the glass. Excess epoxy is picked up with the gloved hand and wiped away into the cup or onto unwetted glass. In the end there should be no air bubbles beneath the glass, and big drips should be wiped up to avoid difficult sanding later. It is common that the ends of the glass tape will become frayed and create a big hairy mess. Try to pull these up and snip them away with your scissors. Don’t forget to clean the scissors afterwards.

Fiberglass tape cut to cover all of the fresh fillets. Pressed lightly onto the fillets to avoid deforming them.
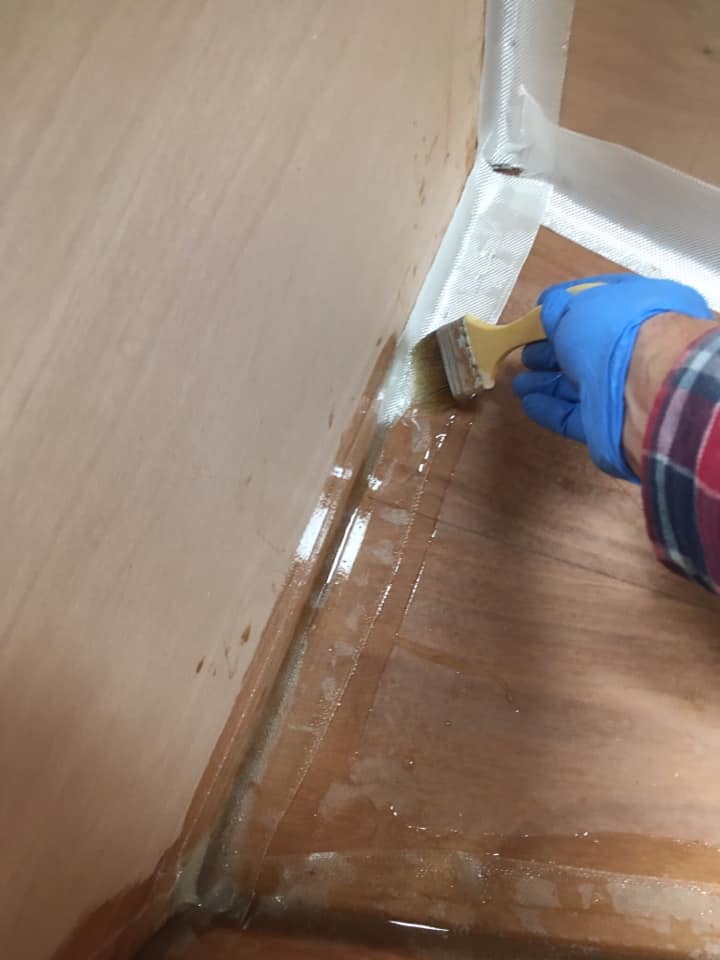
Brush epoxy onto the tape liberally. It takes a bit for it to soak through so brush it onto a lot of tape, until you are out of epoxy in your cup, then go back and start smoothing it out. The tendency for many people is to work a short section of tape until it is clear and smooth then moving on to the next. This will result in losing the epoxy in your cup to premature hardening. When the epoxy is in a large quantity, it is important to get it out of the cup as soon as you can. The chemical reaction that hardens the epoxy happens quickly when it is in the cup in a big batch. Spread out, it will harden at a normal, manageable rate. Don’t dally. Get it out of the cup and on the boat.
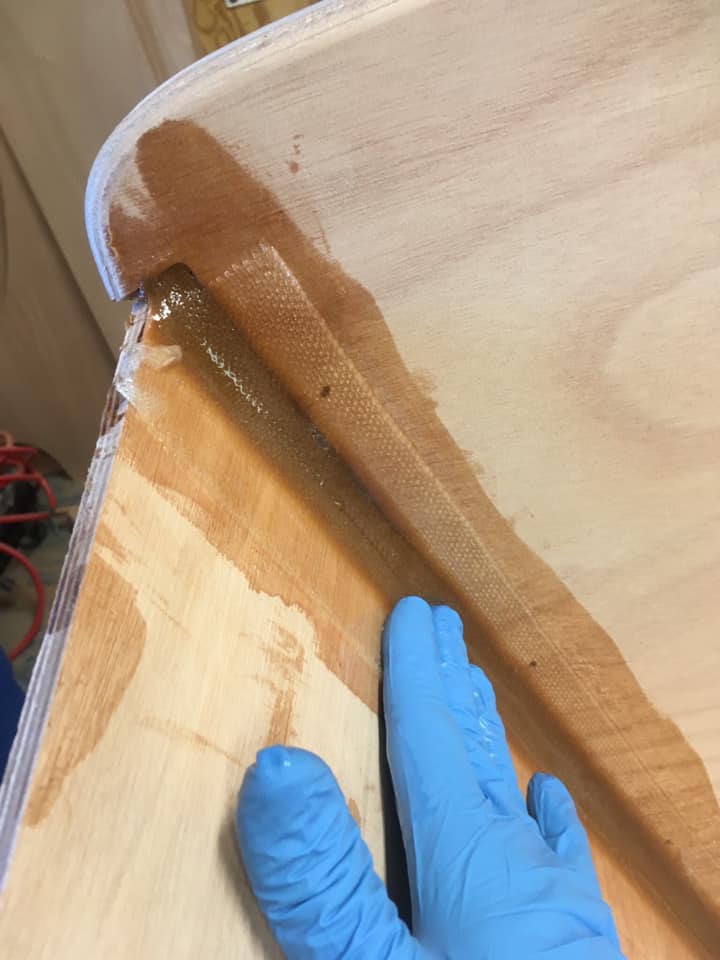
Smooth the glass tape with a gloved hand. Take care to press out all of the bubbles without deforming the fillet.
Today’s progress took me about 6 hours. I was able to do all of this at once due to the chilly winter weather. If it had been Summer and my Air Conditioner couldn’t get it cool enough, I would have done one section at a time to avoid having the fillets harden before I could get the glass wetted out. If you lay out the fiberglass tape onto wet fillets that become hard before you are able to wet them out, they will not become saturated with epoxy due to the thick epoxy (now hardened) that is on the surface of the fibers. This will result in a section of glass that does not go clear and strength will suffer. The fix is horrible sanding until all of the unclear class is removed, then do-over with new fiberglass tape and epoxy. Fortunately, it was chilly enough to avoid this problem today. Still, I worked straight through, taking no breaks until the job was done.
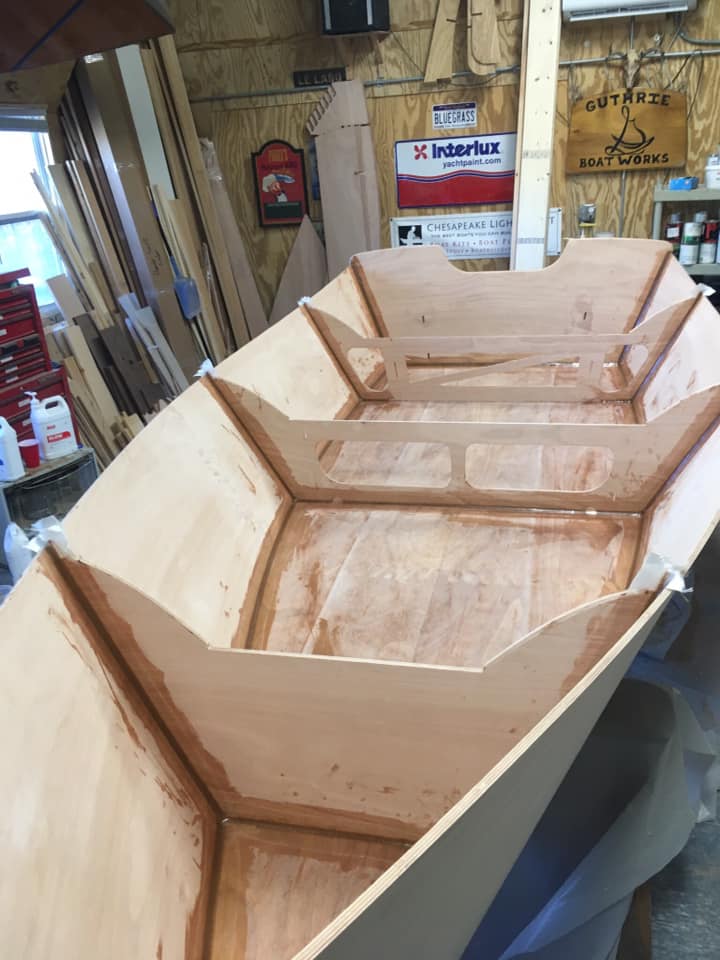
The glass tape on the frames extends past the sheer and will be trimmed off with a knife tomorrow. That is enough for today.


