
Shop Tips » Fitting Out Your Boat |
Installing Knee Braces
 A kayak should not be so tightly padded that it is uncomfortable, but when you flex your ankles and push up with your knees a bit, you should be solidly "locked" into the cockpit. Knee Braces are the points where your knees touch the underside of the deck. You will pull the boat up from a leaned position or from a roll with your inside knee. Our boats with "keyhole" cockpits have a "bulge" in the coaming close to the front of the cockpit, which adds to the area available for knee bracing. You may want to pad this area with Minicel foam. You might also glue a small piece of half-round molding under the foam to keep your knee from accidentally slipping into the cockpit while it "pulls up on the deck." The best glue for foam is 3M #08001 Super Weatherstrip Adhesive, found in auto parts stores.
What you'll need:
- Knee Brace Kit or MiniCel Foam Blanks
- Hacksaw, large knife, or Bonsai Saw
- Heavy-grit sandpaper (40-60)
- Medium-grit sandpaper (100-150)
- Contact cement, 3M #08001 Super Weatherstrip Adhesive, or similar
- Marker or felt-tip pen
- Brush
1. After your seat, footbraces, and backband have been installed, get into your kayak the way you would if you were getting ready to paddle. Sitting upright, your lower back should press gently against the backband. Adjust your footbraces so that your toes turn out and your heels are in, close together. With your legs slightly bent, spread your knees so they gently hug the underside of the deck near the coaming.
The purpose of customizing your cockpit is to provide comfort and to improve paddling efficiency. A full-size knee brace offers a snug fit and increased control, needed for open or moving water situations. On the other hand, a thin or moderate knee brace may be all you need for touring or day-paddling. Different thicknesses of foam should be considered to create the right fit for you or your paddling style, so you may need to experiment before gluing anything into place.
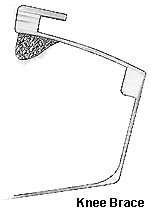 2. Place each knee brace wedge between your knee and the deck, making sure that both your knee and inside thigh are making contact. Trace the brace onto the underside of the deck using a marker. It may be necessary to cut a corner of the brace to fit the shape of the sheer clamp. The corners of the thick side may also need to be trimmed after the brace has been glued into position. Sand the designated deck area and cover with one coat of cement. When both surfaces have dried, brush on second coats of cement. When the second coats have completely dried, carefully position each brace and press firmly into place. Once the cemented surfaces have come together, you will not be able to separate them without tearing one or both. You may want to position one edge first and “roll” the rest of the brace gently into place.
3. Curve each brace to the shape of your knees, keeping in mind the amount of space you’ll need to enter and exit the boat. Lastly, finish with sandpaper.


