Internal Footbrace Mounts
Fitting Out Your BoatWe have long been advocates of KISS-principle footbrace installation: just through-bolt the footbraces to the sides of the kayak hull. However, we've heard from scores of builders over the years who prefer to hide the footbrace mounting bolts on the interior of the hull.
Here's an easy, inexpensive way to do it strongly, with no visible boltheads on the exterior. CLC's footbrace stud kit includes EVERYTHING you need: Four (4) stainless steel studs---enough for one pair of footbraces; washers and nuts; reinforcing fiberglass; and a detailed page of instructions specific to our boats. Voila! Invisible kayak footbrace mounts. Works equally well with Adjustable Aluminum and Keepers footbraces.
NOTE: You will need to shorten the studs in the footbrace mounting kit to work with the Feathercraft K1 and K2 rudder systems. Using footbrace mounting kits with Toe Pilots is very difficult and we recommend you stick with the standard through-bolting system.
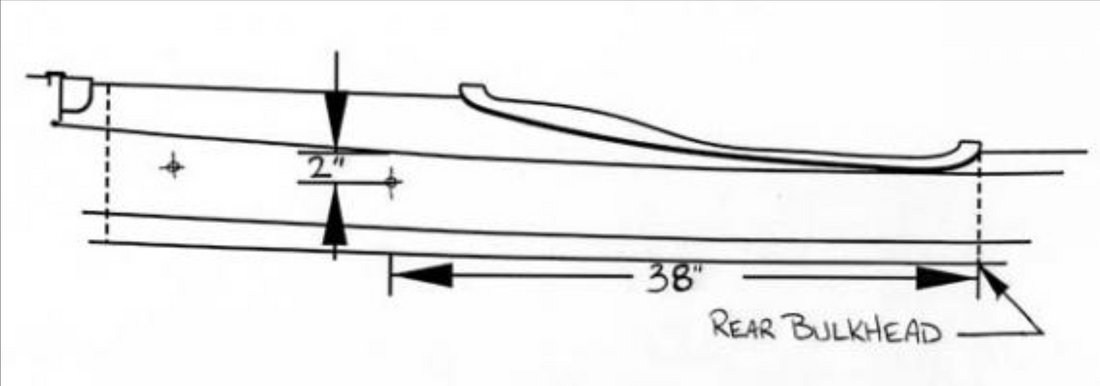
1: Locate the footbraces. The rear end of a pair of adjustable footbraces should be about 38” forward of the aft bulkhead. To be sure this is comfortable on you, it isn’t a bad idea to put the kayak in the grass and have a seat to check the location. The mounting holes should be centered about 2” down from the sheerline of the kayak.
2: Position the kayak. Place the kayak on its side so that the side panel is level with the ground. We'll be installing footbrace studs on one side at a time.
3: Mark the location. Make a clear mark where the footbrace studs will be glued on the interior side of the hull.

4: Protect the threads. If you get epoxy on the threads, you'll be in trouble. Wrap the threads on the stud with tape.
5: Mix glue. Use Cab-O-Sil or Silica Powder to thicken epoxy resin and hardener to a peanut-butter-like mixture. Brush a spoonful or two of the thickened mix onto the side of the hull and press the footbrace stud into the epoxy.

6: Apply fiberglass tape. Cut a strip of fiberglass (included in the kit) into four 3" x 3" squares. Snip a small hole in the center for the bolt, and slip the patch of tape over the bolt. Press the fiberglass patch into the still-wet thickened epoxy around the base of the footbrace stud. Smooth out the patch.