Madness in the Boatshop
I should have known that building a 31-foot multihull in CLC's shop would cause a stir. My first blog post about the boat, back in September, has attracted almost 9000 hits as of this writing. At the time, the proa's nascent assembly was bundled off into our storage lot under tarps while the shop was busy with boatbuilding classes. We resumed work in November. And while I'll not be retiring on sales of kits and plans for a 31-foot proa, the positive feedback is gratifying and has spurred Madness along. Here are some notes on construction so far.
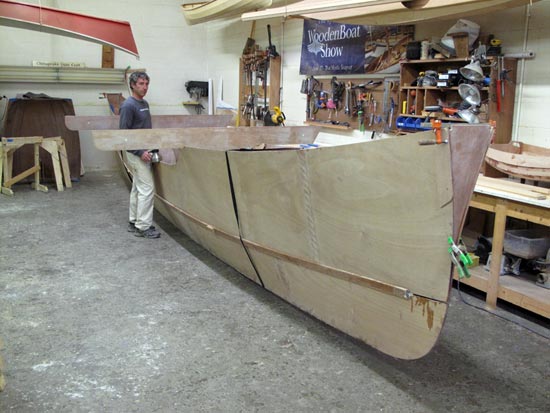
The main hull was all in one piece, briefly, as a way to get the bulky parts out of the way for our December open house. But seeing the shell of the main hull in three dimensions was great fun.
The ugly external stringer visible at the chine is temporary. It helps align the side and bilge panels, and most importantly helps to fair the very long, gentle curve of the chine. Over a distance of 30 feet, 6mm plywood is really floppy, and needs assistance to take on a fair curve.

In these December photos (above and right), the side panels are missing their internal reinforcing stringers. There's a cypress stringer that runs the full length of the side panel on the inside at mid-height, to eliminate "pumping" of the sides while moving fast through waves. Sheer clamps have been glued on, too, to which the deck will be fastened. Amidships, two big bulkheads mark the very beginnings of what will become the cockpit and cuddy cabin. Crossbeams will fasten to these substantial bulkheads.
Here's a detailed photo of a side panel, ready for final assembly. The 22-foot long ama (outrigger, float, whatever) is upside down on horses to the left.

Like any stitch-and-glue boat, large or small, it has been possible to prefabricate almost every component in the boat. We cut the parts on the CNC machine, bring them up to the shop, and assemble them with "puzzle joints" on a long, temporary assembly table. We apply the fiberglass to inside faces of hull parts with the part laid out flat. Combined with the copious use of peel-ply, we've been able to finish the interior surfaces all of the way to 220-grit, rapidly and easily. All at a comfortable, horizontal, benchtop working height!
We'll glue on the side panels once the rudder trunks are installed. Rudder trunks have to be installed before the sides go on; otherwise the internal attachment would have to be done with the boatbuilder suspended upside down by the ankles in the deep, narrow main hull. Rudder trunks, in turn, are awaiting completion of the rudders themselves. The top and bottom bearings in the trunks are molded to the finished shape of the rudders, for a secure fit in the trunk.

The rudders are a tricky bit of fabrication. They aren't for the absolute first-time punter, but the average woodworker will get through it. The rudders have to be strong, very carefully shaped, and of course light. Mine are sitka spruce sheathed in fiberglass. The shaft is thick-walled stainless tube. They are engineered to survive a high-speed grounding. If the grounding is on coral or granite, they'll hold up about as well as a daggerboard or skeg rudder on a sailboat of similar weight and power. The rudders were the first Madness component we started on, back in May, to ensure rudder construction wasn't rushed at the very end of the project. (This happened on my last proa, with memorable consequences out on the water.) Both rudders are rough-shaped at the moment, ready for final filling-and-fairing.

While we await assembly of the main hull, construction of the outrigger continues apace. Now, there's a loose consensus among the multihull literati that the proper term for the outrigger is "ama," and that's the term I've used myself for twenty years. But even among yachtsmen, I mainly get blank stares when I refer to an "ama." They understand when I talk about the "outrigger." So I've decided to start calling it the "outrigger" when I speak of it publicly, and "ama" when talking to the multihull elite. ("Aka," by the way, is the official term for "crossbeam," unless you're in the OC-1 world, in which case it's "iaku." I'm going to start calling them "crossbeams" except in selected company.)

Madness's outrigger is 22 feet long and 21-1/2" wide (6.7m x 0.55m). Stitched up and fiberglassed, it sure looks fast. Very fine-ended. I was somewhat comforted to find proa Jedi-master Russell Brown almost as frustrated with outrigger design as I am. The outrigger is alternately skimming the water, then being driven bodily through a wave crest. Make it too fat, and you get lots of drag. Too small or too fine, and it acts like a submarine. I sure got it wrong on the first iteration of Mbuli; I will never forget watching its outrigger torpedoing along at 10 knots---30 inches UNDER the surface of crystal-clear Tampa Bay. This may sound like fun, but the crew felt like they were waist-deep in Class III whitewater. Gets old. We'll find out if I got it right. The good thing is that it only took 3 or 4 days to knock the outrigger together, so I won't feel any reluctance to refine the shape.

While CLC boatbuilder Carey grapples with Madness in the shop, I've been working the phones tracking down a mast and sails. No luck so far on a mast. I've decided I can't afford a carbon fiber mast, so I'm in the hunt for an aluminum mast section from a Hobie 21, Tornado, Nacra 20, or similar. Please give me a shout if you have a line on a good light mast section over 31 feet/9.5m.
Russell Brown referred me to Sandy Goodall's outfit for sails, and I've placed the order for a main, two jibs, and an asymmetrical chute. I've decided to have them made in Vectran, which is a performance fabric that falls somewhere between good old Dacron and more exotic (and less practical) mylar laminates. The total for the new rags came to $5600, quite a lot more than I have in the entire rest of the boat so far. In Dacron, with a simpler pattern, they'd cost substantially less. A huge variety of stock used sails would fit, too.

I have a fixation on sail quality, dating to my teenage years. I got slaughtered on the race course because my racing dinghy had ancient hand-me-down sails. When I finally acquired a new set of sails, the improvement was so stark that I've never been able to abide bad sails since. Sails are the engine, the entire motive force of your sailboat, the whole point of the exercise.
Coming up, more progress photos and a study of what Madness has cost to build so far.