
Builders' Forum |
|
| ↓ Scroll to Last Comment ↓ | Forum Guidelines | Builders' Forum | |
Greetings,
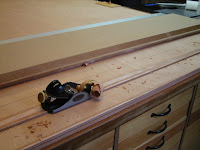
Well, the blanks for my Skerry are cut so now it is time to start scarfing. I have a hand plane but alos poked around the web for any jigs and found this one done with a circ saw. Anyone have success with something like this and still have the fingers to type and tell us about it?
Otherwise my plan is to sharpen plane, scarf on scrap regular plywood, sharpen plane again and go after the Okoume (this stepp intimidates me somewhat).
John
11 replies:
RE: Scarfing with circ saw
In a previous thread...Chris J has a router template that is worth a try.
http://www.clcboats.com/forum/clcforum/thread/1953.html
Plus other ideas.
KIm
RE: Scarfing with circ saw
There are thousands of kayak builders who use, or have used, a sharp plane to cut scarfs. It works, especially with a sharp plane. If you practice a bit with some scrap ply you shouldn't have any trouble. Try a low-angle block plane before jumping to the higher horsepower. Take your time. Good luck.
RE: Scarfing with circ saw
Hi John. Don't be TOO intimidated, just careful! I too was new to scarfing during the recent build of my Chesapeake 17LT, now proudly launched. Practice, as you suggest, on some scraps first.
The front edge of the bottom ply MUST be well-supported right along its edge on (f'rinstance) a solid piece of ply, at least 6mm. Some other key elements are (1) the plane MUST be very sharp - the glue in marine ply seems very abrasive. Re-sharpen between successive joints, or even halfway through one scarf if needed: (2) layers of ply being scarfed MUST be firmly clamped down on top of each other - if they move at all (or if the surface on which you are planing moves) it will undo your otherwise careful approach: (3) mark the scarfs with BALLPOINT pen, not pencil so that the plane-to lines show up loud and clear: (4) I used a Stanley plane (I think it's called a smoothing plane) with a cast-iron 9 1/2" sole plate - quite heavy, which worked for me. You'll need to plane in long smooth strokes right across the faces of the play, rather than in quick short jabs. Looking down from above the joint, make your first strokes across the face at about a 10 to 15 degree angle, so you are cutting across the plies, not down them. Aim the plane in a line from the upper outside corner of the top ply across to the opposite outside corner of the bottom ply. Start the planing action well outside the edges, and follow through to finish well outside on the other side so that your action is nice and smooth.
I ended by lightly 'touching-up' the finished scarf joints with a belt sander, but only because I have one, it didn't seem 100% necessary.
I am preparing to start on my next build, a Shearwater 17, and am almost looking forward this time to the scarfing, there being quite a bit more than on the Ches!
Best of luck!
Wordsmith
RE: Scarfing with circ saw
Alright - I am game for hand planing. I have the plane, will get a stone to sharpen it up. Wordsmith, your instructions were very helpful but I am still a bit unclear on direction. Across and down being relative. If I have the two blanks stacked and clamped I am looking at a rectangle. Are you saying that the strokes should be across the short side, parallel with the short edge? I think that is what you are describing.
RE: Scarfing with circ saw
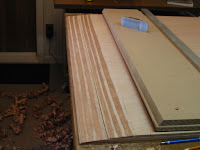
Wordsmith here again, John. Ron's photo of his nicely-made scarfs above will help a lot. My approach is to plane (using the above photo as a guide) across and down the 'ramp', starting at the closer right hand corner (of the top ply), OR the top right hand corner - across the width of the panels - cutting towards the lower and opposite (LHS) corner of the stacked panels.
Aim the plane down at the 1:8 angle and across the longest face of the plies to the diagonally opposite corner. Also, 'twist' the plane a little on the flat so that the blade is not hitting the plies head-on as seen from directly above, but at a slight (say 10 deg) angle. Tricky for me to describe, but you'll soon get the hang of it... cutting a scarf joint in 4 stacked panels of about 8" width overall in this way took me about 20 minutes, including setting-up.
Report later, please!!
Wordsmith
RE: Scarfing with circ saw
Thank you gentlemen,
I especially appreciated the tip on Ron's blog that testing on scrap plywood is actually more difficult. I would have been pretty discouraged. I will hone the plane and have a go on Saturday (and will take some pictures along the way).
RE: Scarfing with circ saw
To clarify just a little... Testing or practicing on scrap ply is recommended, as long as the scrap is the same as your boat building ply, and not low quality luan or fir plywood.
Ron
RE: Scarfing with circ saw
I have found that putting 2 extra pieces of ply , one beneath and one above the job will help with accuracy. and once they have been planed down to the correct slope, they can be used again on the next go.
Robert
RE: Scarfing with circ saw
I use a large rotary angle grinder with a 60 grit disk, then finish off with the belt sander. It's a snap!


RE: Scarfing with circ saw
» Submitted by jshaley - Tue, 3/24/09 » 6:57 PM
Sorry about the double post