Builders' Forum |
|
| ↓ Scroll to Last Comment ↓ | Forum Guidelines | Builders' Forum | |
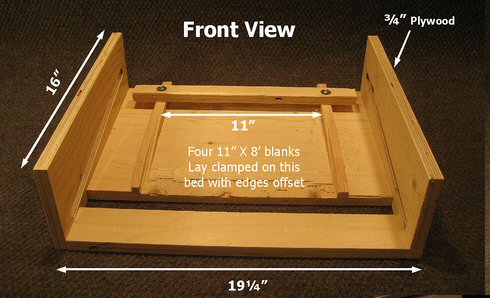
For Chris, or anyone else who may know. Is there a reason for the gap betwen the bottom panels of the jig? I'm making one in preparation for beginning work on a Chesapeake 16.
Thanks to Chris and others who share their insights and creativity on the forum.
10 replies:
RE: Chris J's scarfing jig
Thanks Chris, and thanks for the photos. I appreciate your comments and your work as shown on "Algonquin Paddler". It's been a big help to me in getting ready to start my project. Are you open to more questions when I get stuck if I promise not to be a pest?
My wife and I are sailors who took our first kayak trip in the San Juans in July. We wore ourselves out paddling a big, heavy tandem kayak, but enjoyed the experience and felt it would be much more fun in light, well designed craft. We live on the Peace river in SW Fl. where the paddling will be much easier than what we found in the straits of Juan de Fuco! We did encounter a large pod of orcas which was fun.
RE: Chris J's scarfing jig
RE: Chris J's scarfing jig
Hello Chris
Firstly, I must compliment you on the wonderful set of photographs that you posted on "Algonquin Paddler", I have them bookmarked as an additional guide as I build my Chesapeake 16.
I do have a reasonable block plane but, like you, I decided to make a router jig. Your pictures and measurements were an enormous help and today I decided to cut the first scarfs. That's when things started to go wrong.
The 4mm ply certainly doesn't leave much margin for error. Everything was lined up and clamped correctly before I switched on. Problems I encountered were:
a) One does work a touch "blind" so when moving the router it is quite difficult to see the workpieces.
b) The ends of the scarfs were badly feathered leaving an uneven leading edge.
c) I may have been using a cutter that was too narrow. I note that you used a double-fluted bit of 3/4 inch. Mine was a 10mm ( a tad over 3/8ths).
Any ideas when I might be going wrong ?
RE: Chris J's scarfing jig
Dave...
I tried several clever scarfing solutions before abandoning them to a handheld plane and 36 grit sandpaper, for reasons that included some of the issues you brought up.
One thing I did to fix the problem of working "blind" was to remove a much larger hole around the router bit. I initially had a hole just big enough for the bit to fit through, but after doing one cut I removed about another inch and a half of radius so I could see the work through the router base. I also wore one of those headband LED iights so I could put the light right where I needed it (that's a good piece of gear for any project, but the way.)
The other problems I faced were not insurmountable, but afer building several scarfing devices and butchering several practice pieces (and two non-practice pieces,) I decided to set aside my jig project and re-focus on my boat project. There just seemed to be too many ways for the "real" cut to be just slightly different than the practice cuts.
Best of luck...
Scratch
RE: Chris J's scarfing jig
Hi Scratch
Thank you for your informative reply to my query.
Yes ! I am inclined to agree with you. Routers are extremely handy tools but are not the answer to every woodworking problem. No offence to Chris who took the trouble to post his clever jig design on this forum.
As I do not have the luxury of being able to spoil my panels (already shortened by 32mm (1 1/8th inches) I shall most certainly consider scarfing by hand.
Interestingly, the excellent Assembly Manual provided by CLC with the plans does not go into much detail when it comes to scarfing, the focus (for this section) is on kit building. I do however, have a copy of Chris Kulczycki's superb book "The New Kayak Shop" in which the author discusses various scarfing options.
I shall simply have to sharpen up my plane blades, both the block and another wooden "Krenov" plane with a very narrow throat which I made about 25 years ago, and practise a bit.
Will advise you of the outcome.
Dave
PS. I also find those headband LED lights very useful.
RE: Chris J's scarfing jig
Dave...
I did find this rig by Chris to be my closest approach to success...and yes, no offense intended to him and others who have posted their solutions.
Another little technique I used was to scarf by whatever means, then use a razor blade and straight edge to cut the "feather edge" to a staight line. I doubt the tiny bit of material removed effected the strength of the joint in any way, and the resulting gap, when filled and sanded, will almost certainly look better than a ragged edge. Of course, this may be worth doing only in areas where the bare wood will be visible.
Cheers,
Scratch
RE: Chris J's scarfing jig
Scratch
Thanks for the additional tip. Will remember it.
I've done a bit of practising, after sharpening up my block plane (the Krenov one was a bit large). I was actually amazed at how easy it was to plane to the correct angle with the plane set very finely and cutting with the tool at a 45 degree angle to the workpiece.
Just one question. This-afternoon (I am +/- 8 hours ahead of your time) I stacked three dummy blanks of 5mm ply (scrap), each piece set back by 40mm to match the 1:8 ratio. I found it far more stable than just trying to cut one piece at a time.
I presume that this is the way you did it ?
Finally, where does the 36 grit come into play ? That's pretty coarse paper.
On a block I presume it smoothes out any irregularities that planing may have left ?
Nearly there.
Dave
RE: Chris J's scarfing jig
Dave...
Sorry for the delay...I've been spending more time in the real world with visiting relatives.
Yes, I did stack three boards at once. It's important to make sure the resulting ends are parallel when the top board is "unfolded" and the pieces are laid end to end. This is NOT the same as making them parallel when they are stacked up ready for the scarfs to be cut. I laid them out on the plans and marked the desired locations of the ends in order to make this happen.
I'm a complete novice with a plane, so I sometimes found it easier to quickly remove material with the coarse sandpaper rather than with the plane. I found that there is a point after I've planed down the corners of the boards but before they have joined into a single ramp, at which my blade doesn't want to cut. The blade is clearly set too shallow, but if I make it deeper it will grab big chunks when I don't want it to. I'm sure it's a matter of geometry involving the width of my plane, the dimensions of the board, etc.
So, I plane initially, then us the sandpaper to get pretty close to the finished shape, then plane again. Then I finish with some finer paper.
I actually have to panels yet to scarf, so I'm still working on the process.
RE: Chris J's scarfing jig
Hi Scratch
Me too ! Picked up your post this-evening, three days later.
I've managed the scarfing. but found that the plane blade needed sharpening after about ten strokes. It also had to be set very fine lest I tear out bits.
On my first round I stacked four sheets (staggered) and everything was great with the initial cuts, but got more complicated as things progressed. By the time I had nearly got to where I wanted to be (an even slope with nothing left to remove), it became very difficult to remove material, even with a freshly sharpened plane blade.
With the second set of four, I did them in two's ('scuse the Irish !). Much better. I did use some sandpaper at the end.
Have now glued up three of the four panels (six of the eight). I prefer to do them one at a time rather than stack (what's the rush ?). Tomorrow the fourth. All going well, so far.
Next up is the problem of the straight edge for laying out the offsets. Chalk lines aren't accurate enough and no one makes a sixteen-foot straight edge. I may use a piece of string, stretched taut.
Getting there slowly and enjoying it.
Someone once said that boat-building is a series of problem-solving exercises. They were right.


RE: Chris J's scarfing jig
» Submitted by Chris J. - Fri, 10/24/08 » 1:38 PM
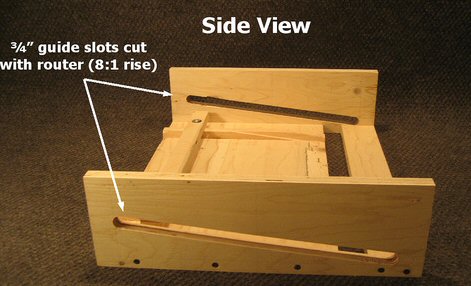
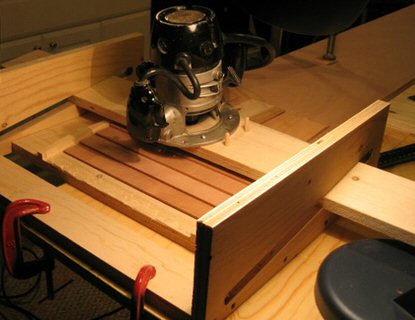
No reason for the gap. Just didn't have a scrap piece of board big enough for the entire base but I still wanted enough to clamp to the work table. Hopefully these pics show the jig better.